Deck Flashing is about how this Architect flashes the decks of their projects to result in better protection.
This is one of those online technical articles sure to make most people yawn. Unless you recently had a party on your deck and had it collapse, injuring your family and friends. To see the reality of this issue, just go on YouTube and Google the term: deck collapse. There you will see many examples of improperly built decks that have fallen. Some with people on them. People can die. And the root cause can often be the deck edge flashing (or lack thereof), where the deck attaches to the main structure of a house (or other building).
All photos © Copyright 2018, Home Architect, PLLC, All Rights Reserved Worldwide.
Protection from what?
2 things:
1. rain water.
2. corrosion.
These are both critical issues and each is handled in a different manner.
RAIN WATER RESISTANCE
To successfully keep out rain water from the house or building is critical. To ignore this or handle it unprofessionally will likely end up in disaster, either physically, in terms of a structural collapse, or in terms or rotting and mold damage to the deck and main building structure.
So what’s the best way to do this? Building code doesn’t show you how. And whatever information is less than adequately detailed. It takes an experienced Architect who has learned how to solve this problem over decades of real world experience.
There are 2 water penetration situations that must be solved for a successful deck flashing detail. One of them, is: you need to have a tall vertical flashing between the rough framing structure of the house (or building) and the deck nailer board. The deck nailer board is the PT (Pressure Treated) wood 2×10 or 2×12 (or whatever size) continuous board up against the main house to which the deck joists are connected. This nailer board has to be fastened in a permanent and waterproof manner. While code and certain manufacturers claim that there are now long screws that can be used (that are probably well-tested and approved), this particular Architect prefers using thick bolts that penetrate through the nailer board and a double PT rim board that sits on the sill plate of the foundation wall. Thinner connectors could possibly corrode over time and this architectural firm wonders if the structural integrity of thinner fasteners over decades could be compromised. During a discussion about PT chemicals (below) you will soon discover why.
TALL VERTICAL FLASHING
So: you need a tall flashing between the nailer board and the rim board of the house. Code is specific about one thing: you may NOT have any sheathing or siding between the nailer board and the rough framing of the house. However, in certain circumstances they may allow structural sheathing, but this firm typically doesn’t detail in this manner, because they have witnessed crumbling of OSB sheathing over the course of decades, at the bottom, which is exactly where it would be in a deck detail. So here we are connecting the nailer board to the structural frame of the house.
PEEL AND STICK MEMBRANE
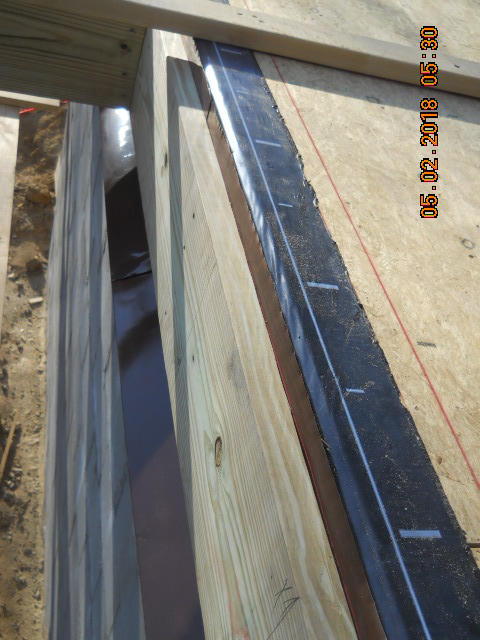
Having said that, this firm first has a peel and stick waterproof synthetic membrane installed over the face of the rim boards, down to the break in the termite flashing and up over the top edge of the subfloor sheathing. Any water trying to penetrate the joint between the deck nailer board and the main house framing will have to get through the peel and stick membrane. Such membranes are often 40 mils and extremely sticky and great at keeping out water. This is the last and best line of water penetration defense and it’s relatively economical in terms of cost, and easy to install. Anyone Not doing this is missing a real bargain in terms of cheap and easy water protection. And yet: most Builders don’t do this! Which is why this Architect insists on it in their specifications and details: to help their Clients obtain more durable custom homes.
If you look at the top of the photo above, you can see the black peel and stick membrane, to the right, securely adhered to the subfloor.
METAL/RIGID VERTICAL FLASHING
Over the face of the peel and stick membrane, you really should have a layer of more rigid protection like metal or durable plastic. You don’t want any UV (Ultra-Violet) sun rays beating down on synthetic membranes. UV will crack them over just a few months, making them fairly useless. They must be covered. (continued below)
The vertical deck nailer board will cover them, however, you also need a bottom edge flashing drip edge (usually formed at a 45* angle sloped down and out) and perhaps a couple of inches long, to cover the top of the various layers of wall sheathing, possible thermal sheathing, siding water barrier membrane and finally the exposed wall cladding.
The peel and stick really isn’t suitable to handle the bridging between these various elements and would crack over just a few weeks, look very ugly in terms of edge detail and also could fail wherever UV manages to hit it.
Therefore, for this and other practical reasons, some type of metal is typically used as the vertical tall metal flashing between the deck nailer board and the peel and stick membrane over the house frame structure. The metal serves as a permanent and rigid barrier between the outside world (rain) and the interior house structure. It should have a very tall vertical leg (that goes behind the deck nailer board and above it, to the top of the main house subfloor). At the point below the deck floor framing, perhaps an inch or so under the nailer board, a bend should be made, as discussed above, about 2″ long and at a 45* angle down and out to cover the top of the various wall siding materials. The outer edge of this metal should be hemmed.
Hemming metal flashing is very important: 1.) it makes the metal twice as strong and creates a crisp, straight edge that look better, 2.) the hem edge provide a consistent drip edge for rain coming down, and 3.) helps prevent workers from seriously cutting themselves on an otherwise razor sharp metal edge. Also, this firm specifies that the rear of the deck nailer be covered with an exterior grade sealant just before attaching to the wall (over the vertical flashing), as this will inhibit the ability of rain water to be able to run behind the board, seeking avenues of penetration through nail and bolt holes.
But wait a minute: there’s an open gap at the top of this metal flashing piece, up there level with the subfloor sheathing. What happens there? Good question. Which brings us to the next crucial flashing type:
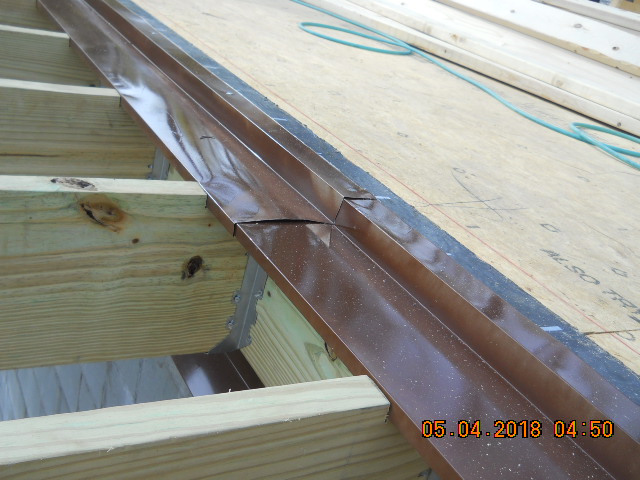
METAL/ RIGID “Z” COUNTER FLASHING
The top of the vertical deck nailer flashing and the conditions under doors at decks must be contained and flashed to successfully keep water from penetrating the structure. Water is unforgiving and will try to get into a house and building wherever it can. Sort of like a sneaky vandal, intent on damaging your house.
Therefore, at the deck offset where the deck nailer board and deck joists are a little lower in height down from your main subfloor level, you’re going to want to install a very special “Z” flashing, so named, because it kind of resembles that letter of the alphabet in its profile shape. You can see this firm’s trademarked “Z” flashing clearly in the photo above. However, this architectural firm goes one better: they also indicate a vertical rain drip hemmed edge that turns down into a sawcut right into the top of the deck floor joists themselves for about 3/8″ high. Otherwise, the surface tension of rain water would simply turn under the horizontal outer leg of the “Z” flashing and run horizontally under the flashing, depositing the rain water at the worst possible location: the joint where the vertical flashing meets the deck nailer board, testing that joist with every rainfall. How much better, to make sure the water safely drips down at the “Z” flashing’s outer edge. That’s a great idea! As the late, great Architect Mies van der Rohe said: “God is in the details.”
Now, you want to have a vertical bend in the “Z” flashing, taking the metal up to just above the top of the main house subflooring (actually just above the horizontal portion of the peel and stick membrane), and inward for a few inches.
And so: you now have a double flashing solution:
1. Vertical flashing.
2. “Z” counter top flashing.
Together, they form a great barrier, in terms of physical geometry, to keeping water out.
Now the next issue:
PREVENTING/ REDUCING CORROSION
Nothing is simple, it seems, especially in terms of construction details. There’s always something remaining that can cause problems, if not dealt with before the actual construction begins. Hence: Architects of custom houses.
Okay then: the building code (IRC and it’s various amended versions in all of the 50 states and also in some other countries) simply says: “Corrosion resistant flashing” must be used. They also outlaw aluminum.
Really? But various roofing and other material supply stores only sell aluminum and “galvalume” for use as flashings in conditions exactly like this.
Okay, so what’s the problem?
Here’s the problem: during the last several years, according to the US EPA, one of the most popular PT (Pressure Treated) wood preservatives is ACQ (Alkaline Copper Quaternay) and Copper Azole and other copper particle treatments. You can’t really see the copper, but there are microscopic copper particles pushed into the wood, to render it less susceptible to mold and rot and less tasty to bugs.
So what? Well, copper is aggressively electrolytic with aluminum, galvanized steel and several other metals. In other words, the copper particles in the PT wood (deck nailer board and deck joists) can and will chemically react with aluminum flashing, galvanized coatings on steel and other materials, which makes the use of aluminum flashing not only not wise, but forbidden by the Building Code. And so what do you use? You could consider using galvanized steel, but electrolytic tables clearly spell out that bare galvanized metal will suffer (corrode) when even rain water draining down from copper containing materials (like today’s PT wood) slide over them.
So what to do? You could consider using painted galvanized steel. Good luck finding coil stock of galvanized steel factory painted. So you can buy coil stock galvanized steel, then bend it into shapes with a field sheet metal brake, then spray paint it with Rust-O-Leum gloss enamel paint. That should work for a while, with the paint coating helping to protect the galvanized steel. But for how long?
So what now? How about this: consider using a 16 gauge copper roll stock for the metal flashing material, bent in a field sheet metal brake, THEN ALSO PAINTED (both sides) with a gloss rust-inhibitive enamel paint? What would that do? Well, one may assume that the copper in the PT wood, would probably be unlikely to attack the copper flashing. And the paint over both sides of the copper should help protect it and also perhaps reduce the ions draining off and damaging other materials below it.
What other materials below it? Well, how about the Simpson galvanized steel connectors everyone uses to fasten the floor joists to the deck nailer boards? And while we’re on that subject, you’d think that this billion dollar company would do something to improve it’s coating technology to help its fastener metal from becoming corroded from the copper in the PT wood, wouldn’t you? This architectural firm has not heard anything about such precautions. So the entire world is using metal connectors that will likely become corroded over the years, because of the electrolytic incompatibility. Good grief? What to do?
How about this: why not call for every single galvanized steel connector used outside to be painted, completely (all surfaces of each connector type) with a spray paint coating (2 coats at least) of rust-inhibitive enamel. Surely, that would help resist corrosion. So if the copper flashing is painted and the galvanized steel support connectors are painted, the only other culprit emitting copper ions would be the floor joists, nailer boards and decking. So how about we call for those to be painted also? And if not with actual “paint” (which requires grueling sanding and repainting periodically), how about solid stain? Anything to help contain the copper particles coming from it. One wishes that Simpson and other large companies making the galvanized steel connectors would start offering special UV resistant plastic coated connectors to protect them from the copper particles of the wood they fasten together. Hopefully they will read this online article and invent a new product.
And so, as Paul Harvey used to say: Now you know the rest of the story.
This architectural firm is now implementing all of the above procedures into its details and specifications in an effort to resist both rain water penetration and to resist corrosion.
mountain, timber frame, post and beam, deck flashing, cashiers, highlands, glenville, sapphire, sevierville, tennessee, hendersonville, asheville