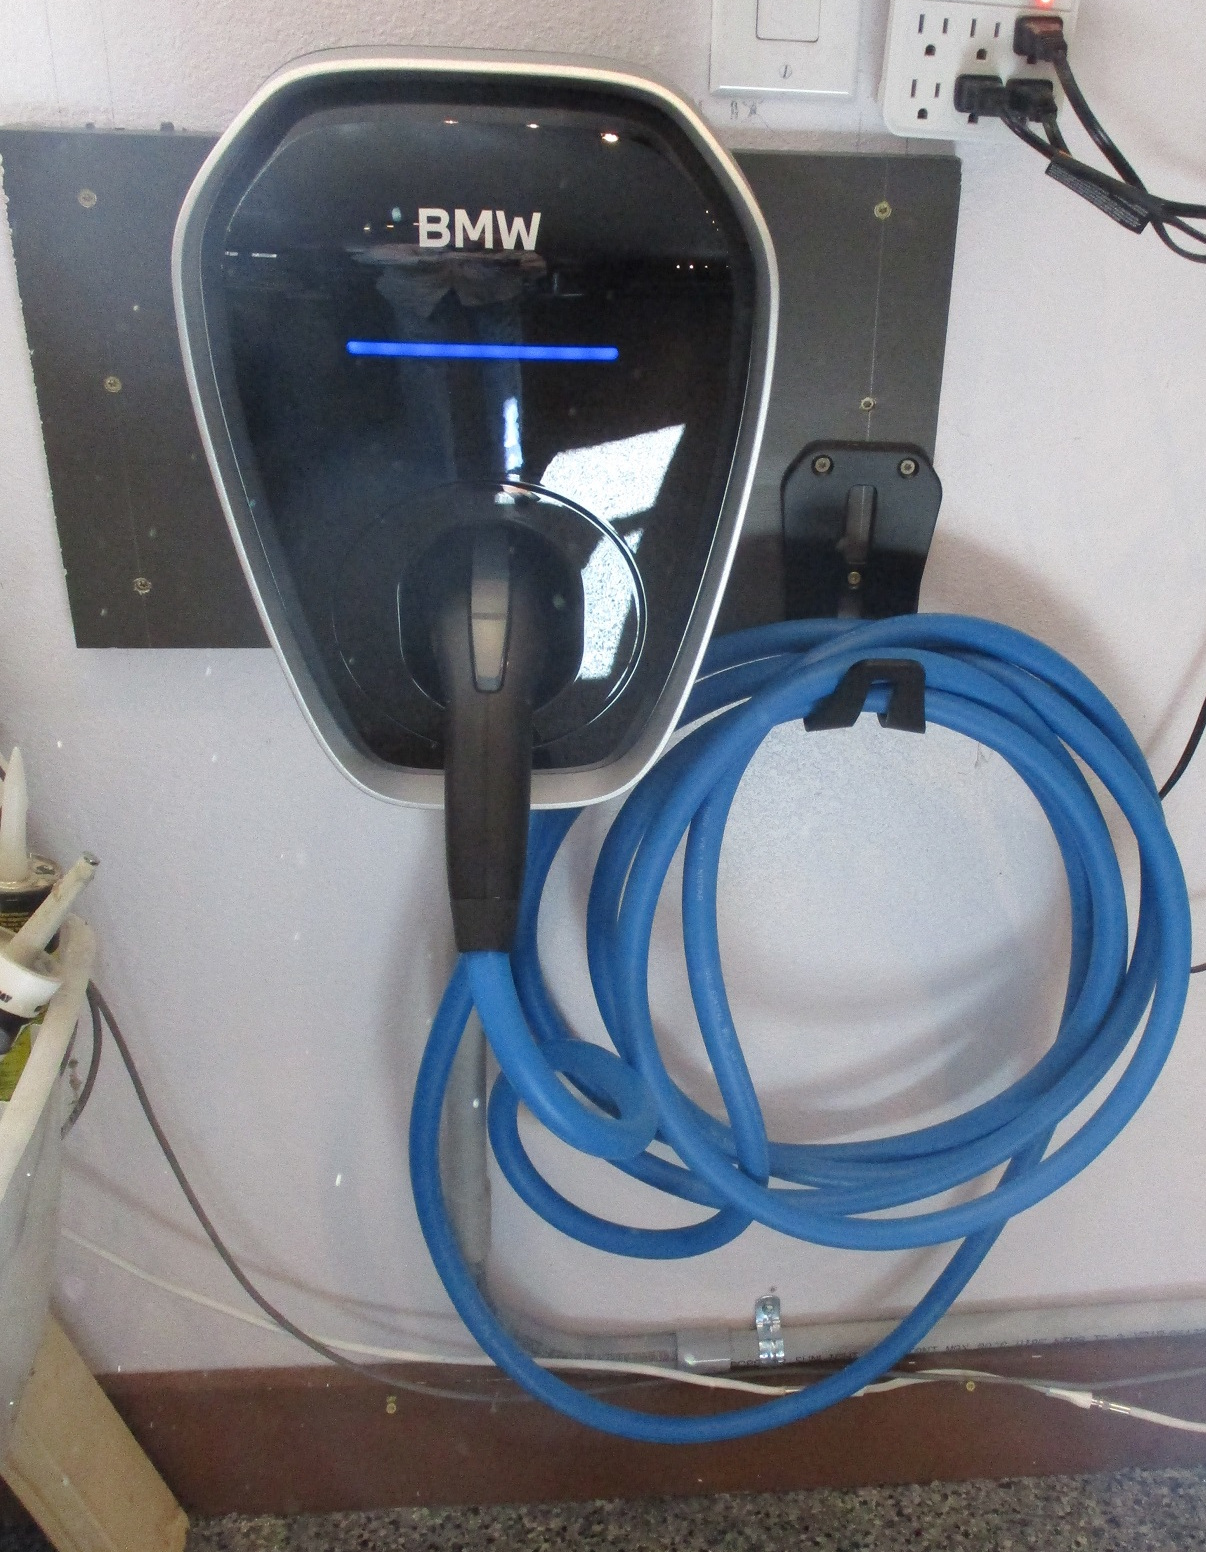
BMW Home Wallbox Charger Install is about how this architect firm managed the process of installing a 2023 BMW 240v 9600 watt charger onto a garage wall and connected wiring.
The REASON for installing this 240v charger: so your plug-in BMW can obtain a full charge in 5 to 7+/- hours, providing you with from about 30 to 38 miles of pure electric travel, which not only is fun, but provides fossil fuel enhanced mileage up to 52 mpg according to BMW literature, as well as owners of the X5 2023 plug-in. Your mileage and charge will no doubt vary from these figures.
If you’re going to be doing this and having your Electrician wire this, there’s some critical information you need to know and without it the charger will not work at all. Read on.
1. MAKE AND MOUNT YOUR OWN WALL PLATE ON THE DRYWALL
The charger kit comes with screw attachments made for drywall, which in the Architect’s opinion are inadequate to the task at hand. Better to fabricate your own wall plate out of 1×12 and screw it through the gypsum board (drywall) into studs.
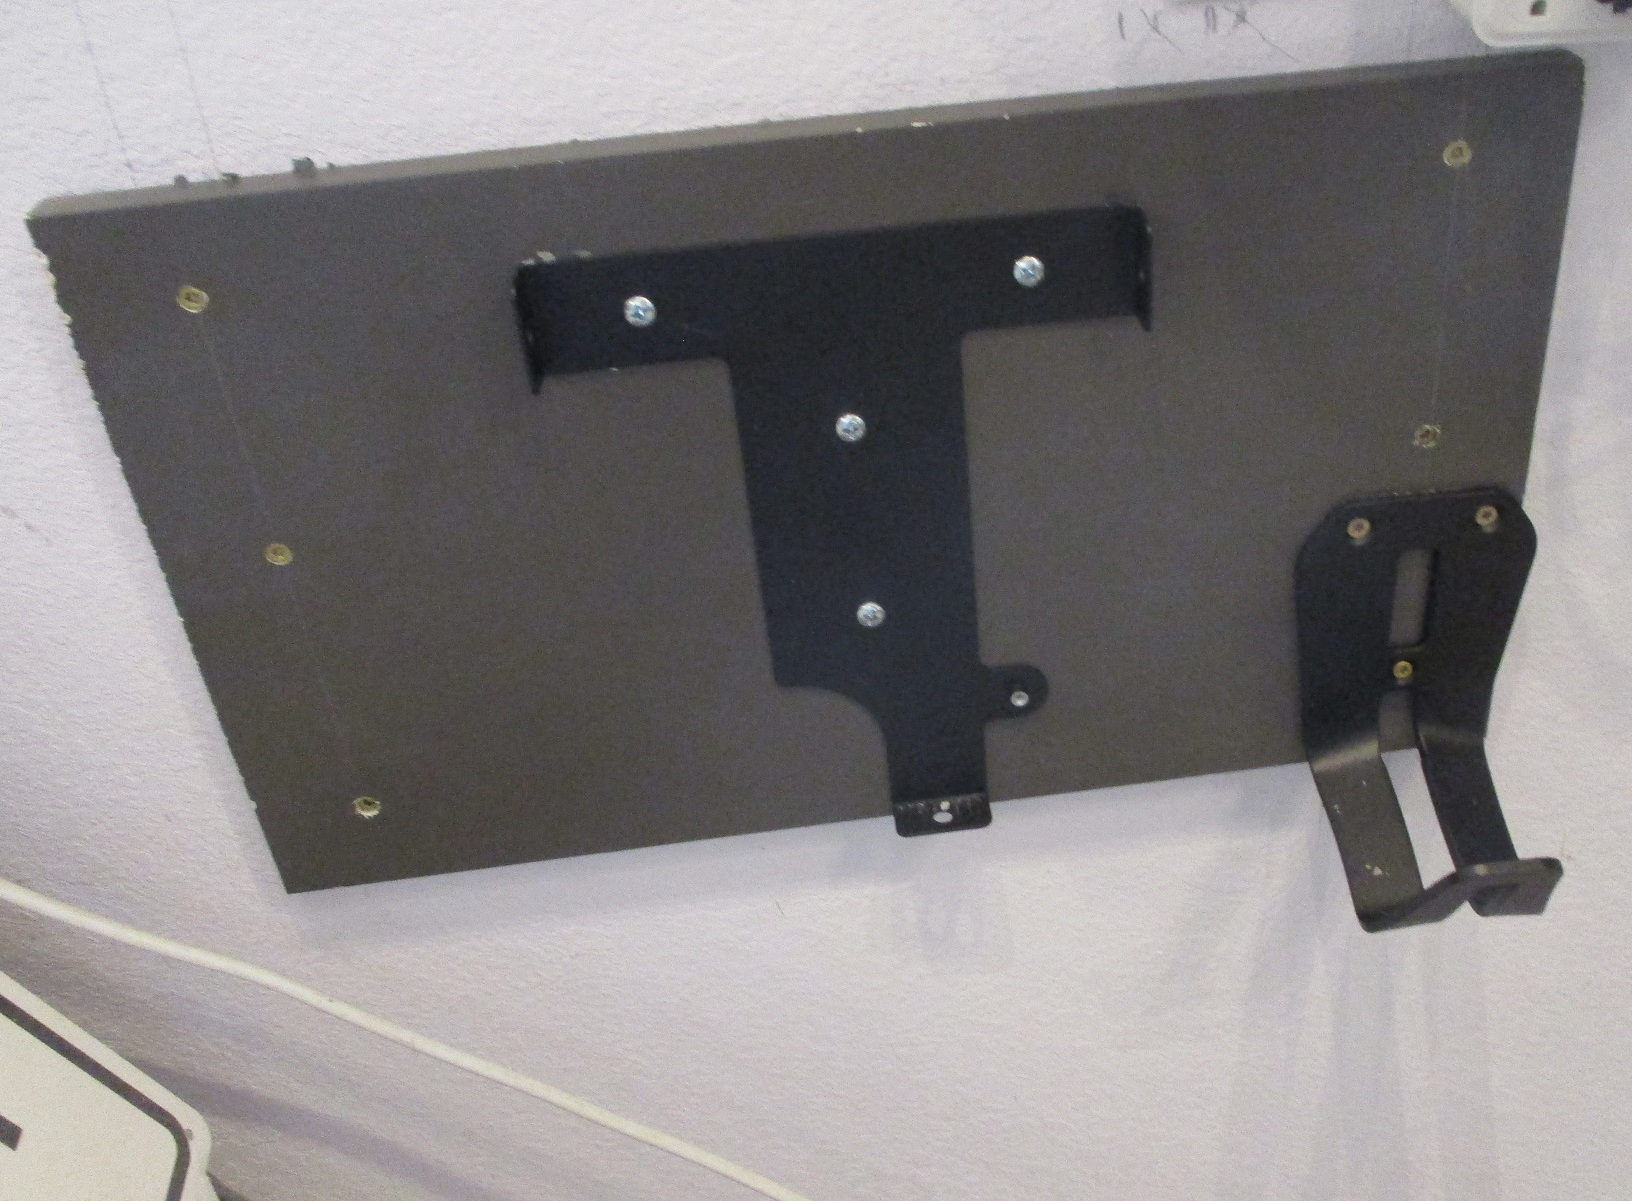
Architect had some scrap 1×12 lengths left over from a cabinet project that were already painted a handsome dark gray and happened to be about 20″ long, which was just perfect to mount on the wall with the studs at 16″ o.c.
Architect used a Franklin stud finder that can “see” through the drywall and “read” denser materials underneath, precisely locating the hidden studs. He used 2-1/2″ long star drive screws and a star drive fitting for his variable speed drill and ran the screws through the 1×12 and into the studs, providing an extremely secure wall plate on which to mount the BMW “bracket” (black center) and cable holder (black right). This makes for a much more secure base for the entire set-up.
2. HIRE A LICENSED ELECTRICIAN TO RUN AND CONNECT AN ELECTRICAL CABLE AND CIRCUIT BREAKER FROM YOUR ELECTRICAL PANEL TO YOUR WALL CHARGER
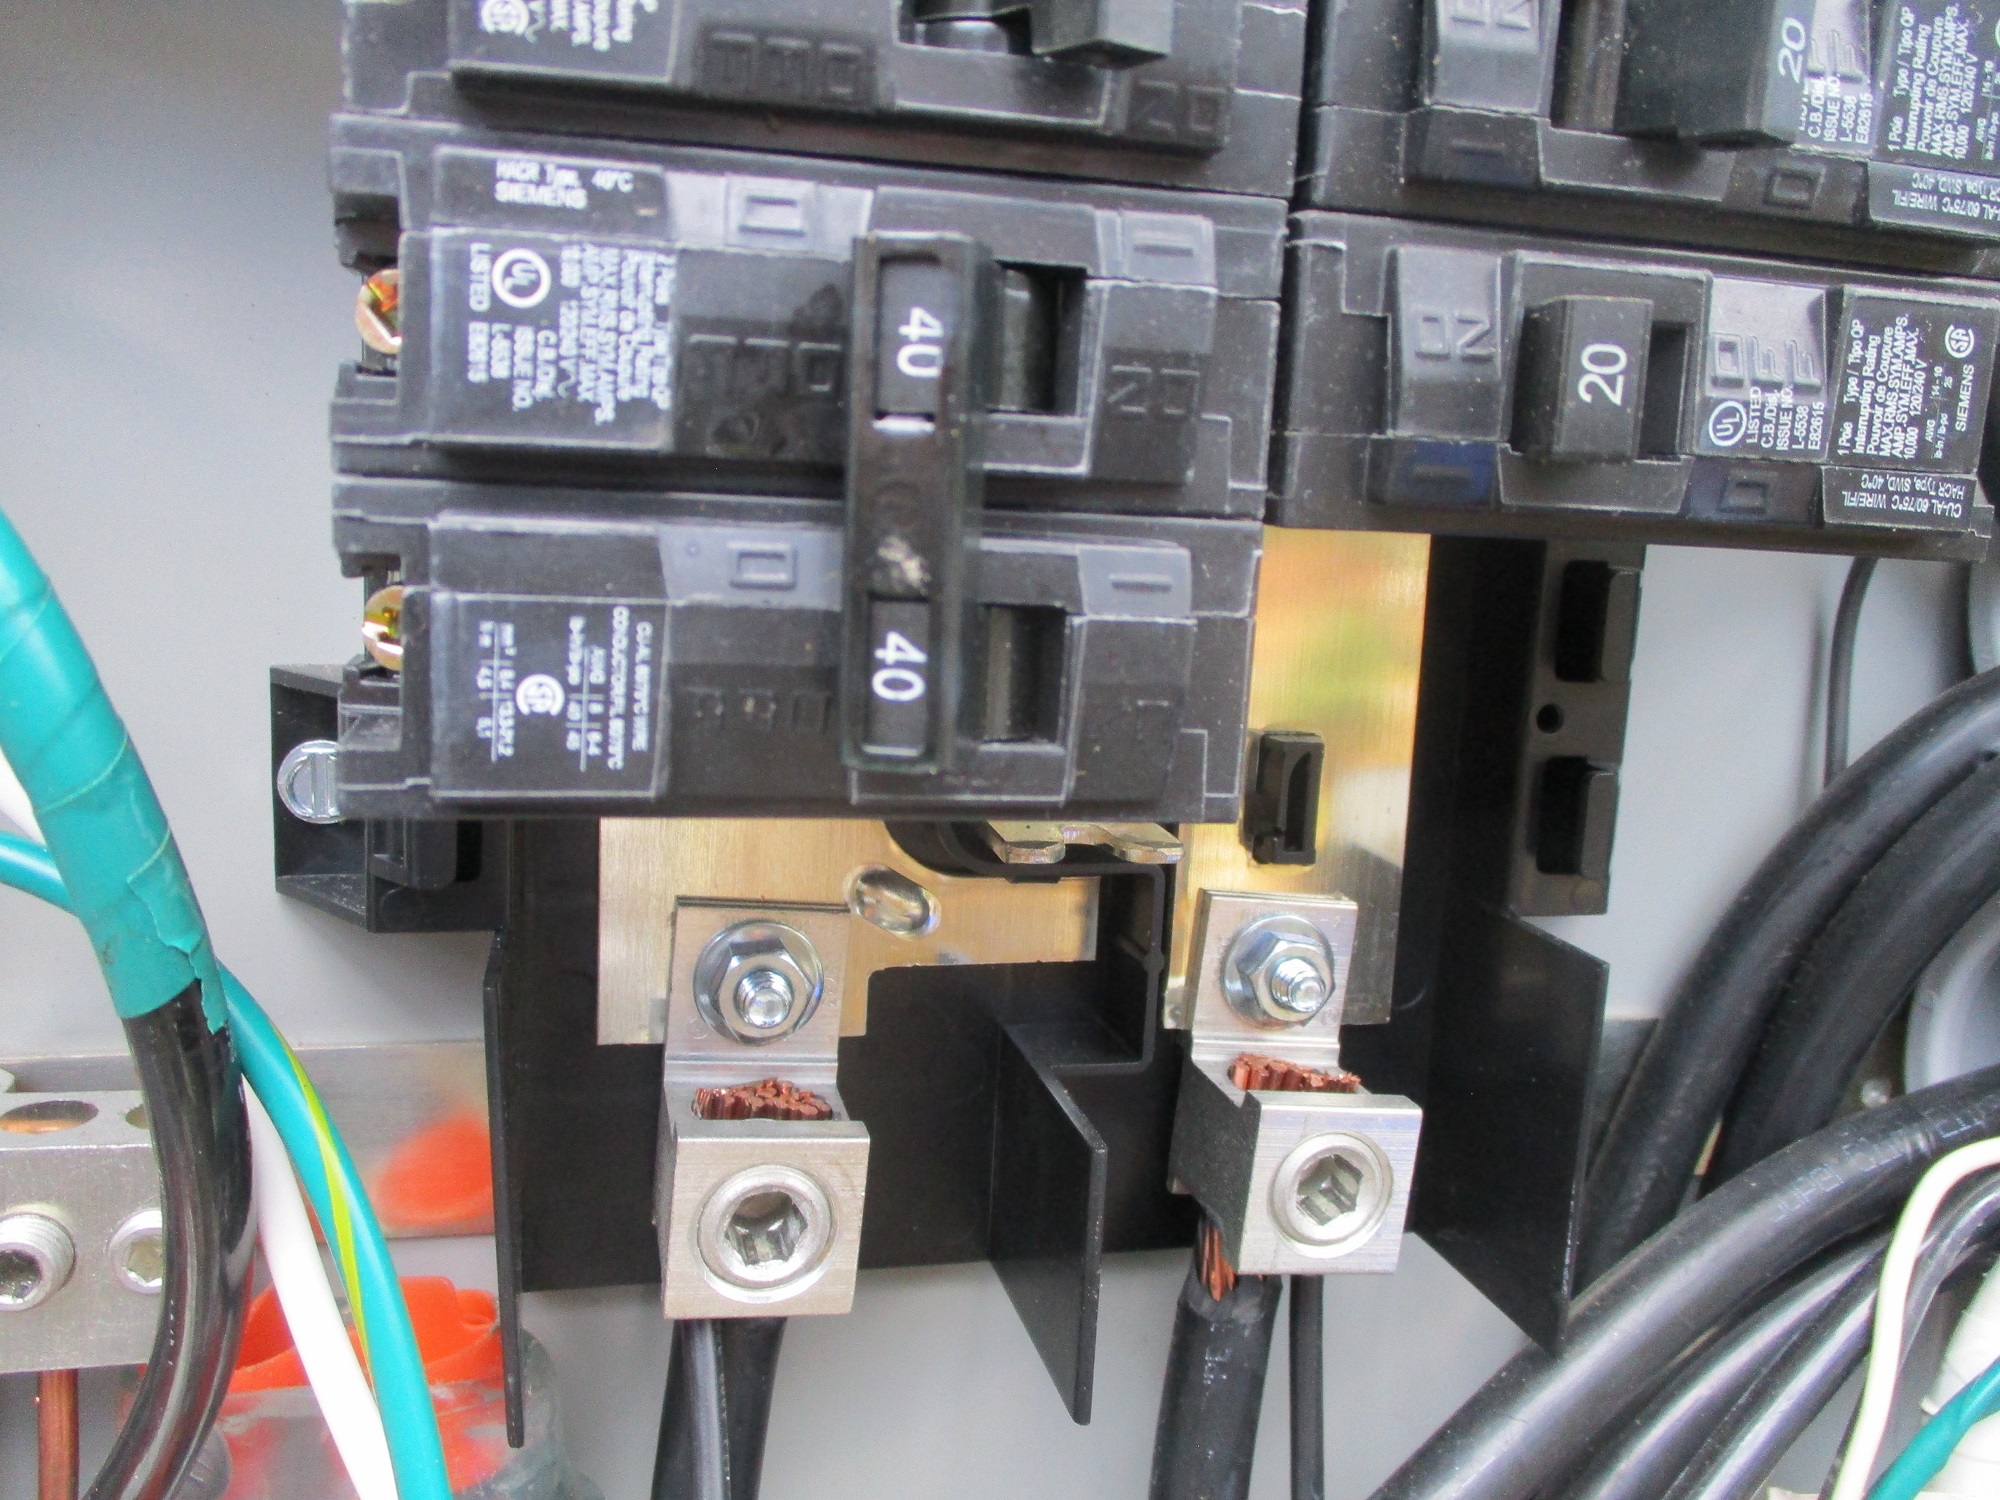
In this particular case, this house has a whole-house emergency electrical power generator (a Kohler 20kW) that fed all the panels inside the house. Now then, this BMW charger draws 9,600 watts of power, or nearly half the electrical power generated by this generator. That would not be prudent to use all that juice from the generator side. So, the Architect had the Electrician install a 40a breaker in the exterior power panel immediately to the right side of the meter base, BEFORE the entire household was run through the generator, keeping the operation of this car charger not within the province of the generator. Logic: if the generator happens to be called into service while charging the car, the charger will stop working. Not the end of the world. This is a hybrid BMW plug-in that also has a 6 cylinder turbo-charged engine, so the vehicle will be operational and has a hybrid mode in which both the engine and the batteries work together, in addition to a full-electric mode. So no harm done, once in a big while.
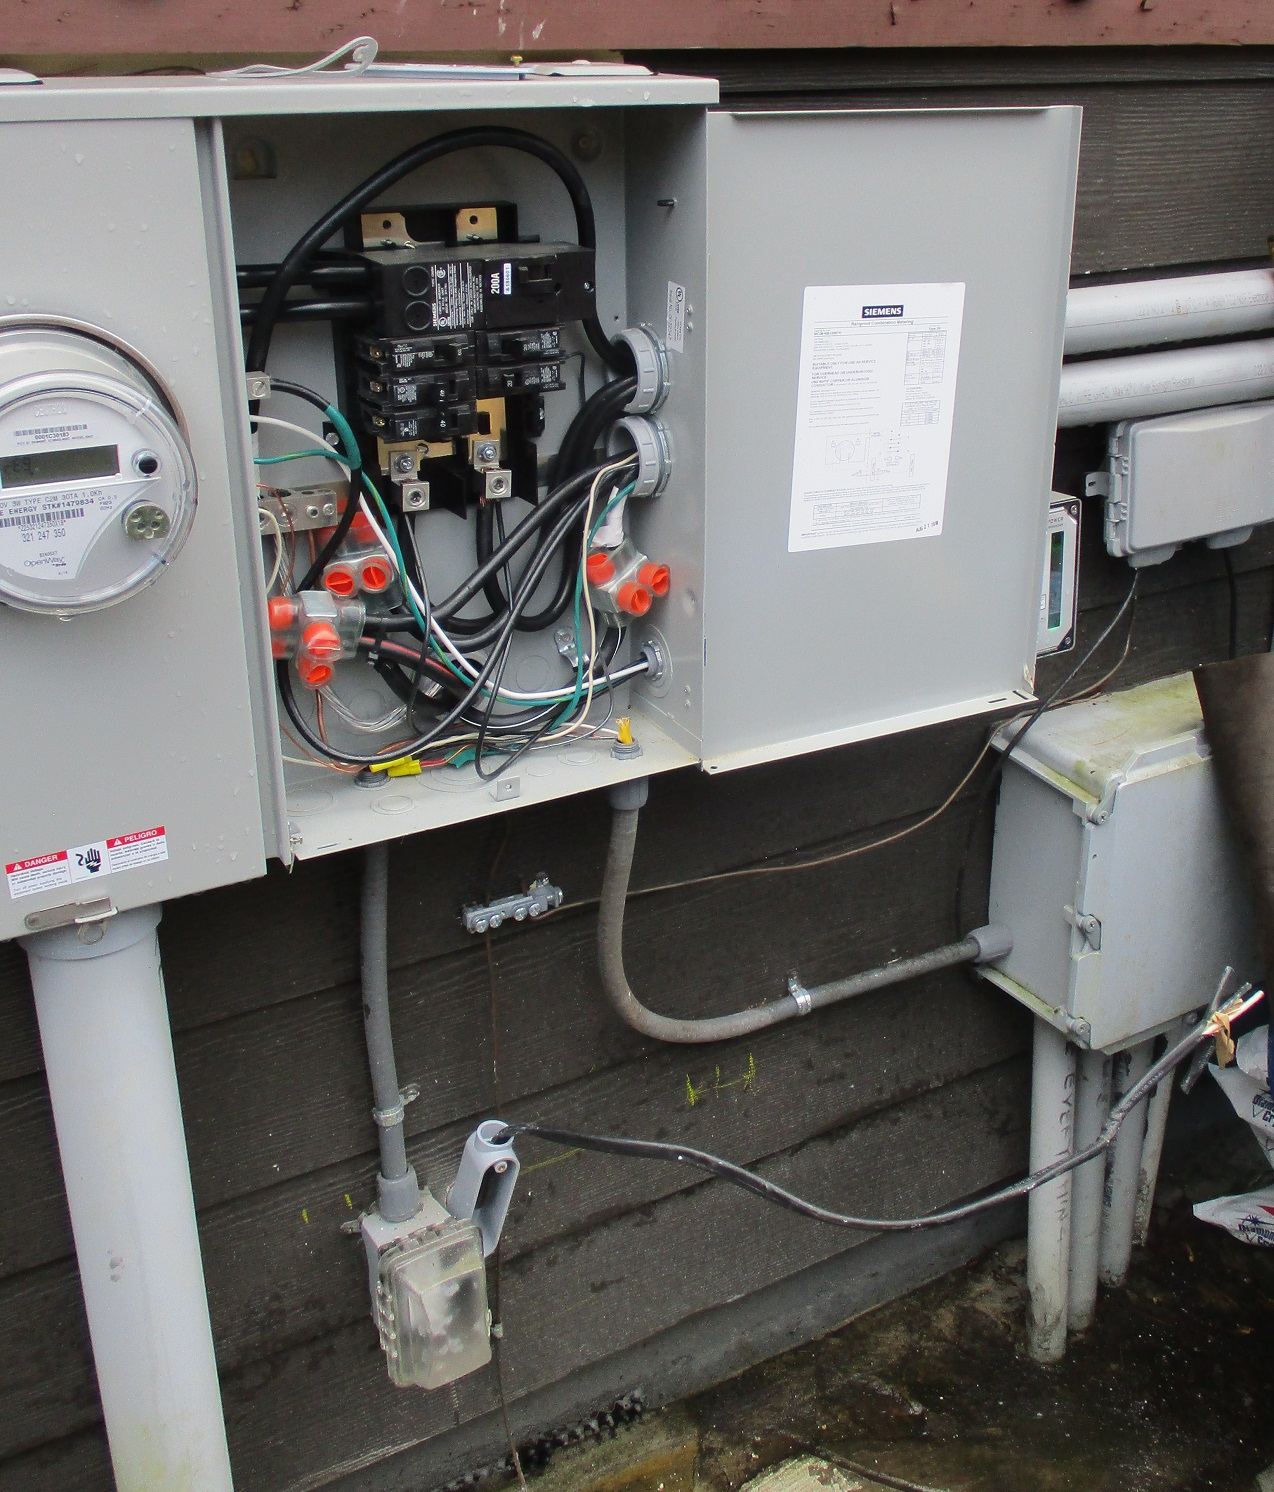
NOTE: SURGE PROTECTOR: you should have your Electrician attach the wires for a heavy duty outdoor rated surge protector to the bus bars to which the breaker for the charger is connected. The idea is to have the surge protector absorb any electrical surges rather than the new 40a breaker for the charger. Why: because the BMW charger has delicate micro-circuitry that could easily be fried by a voltage surge, requiring you to have to replace it, which is both inconvenient and costly.
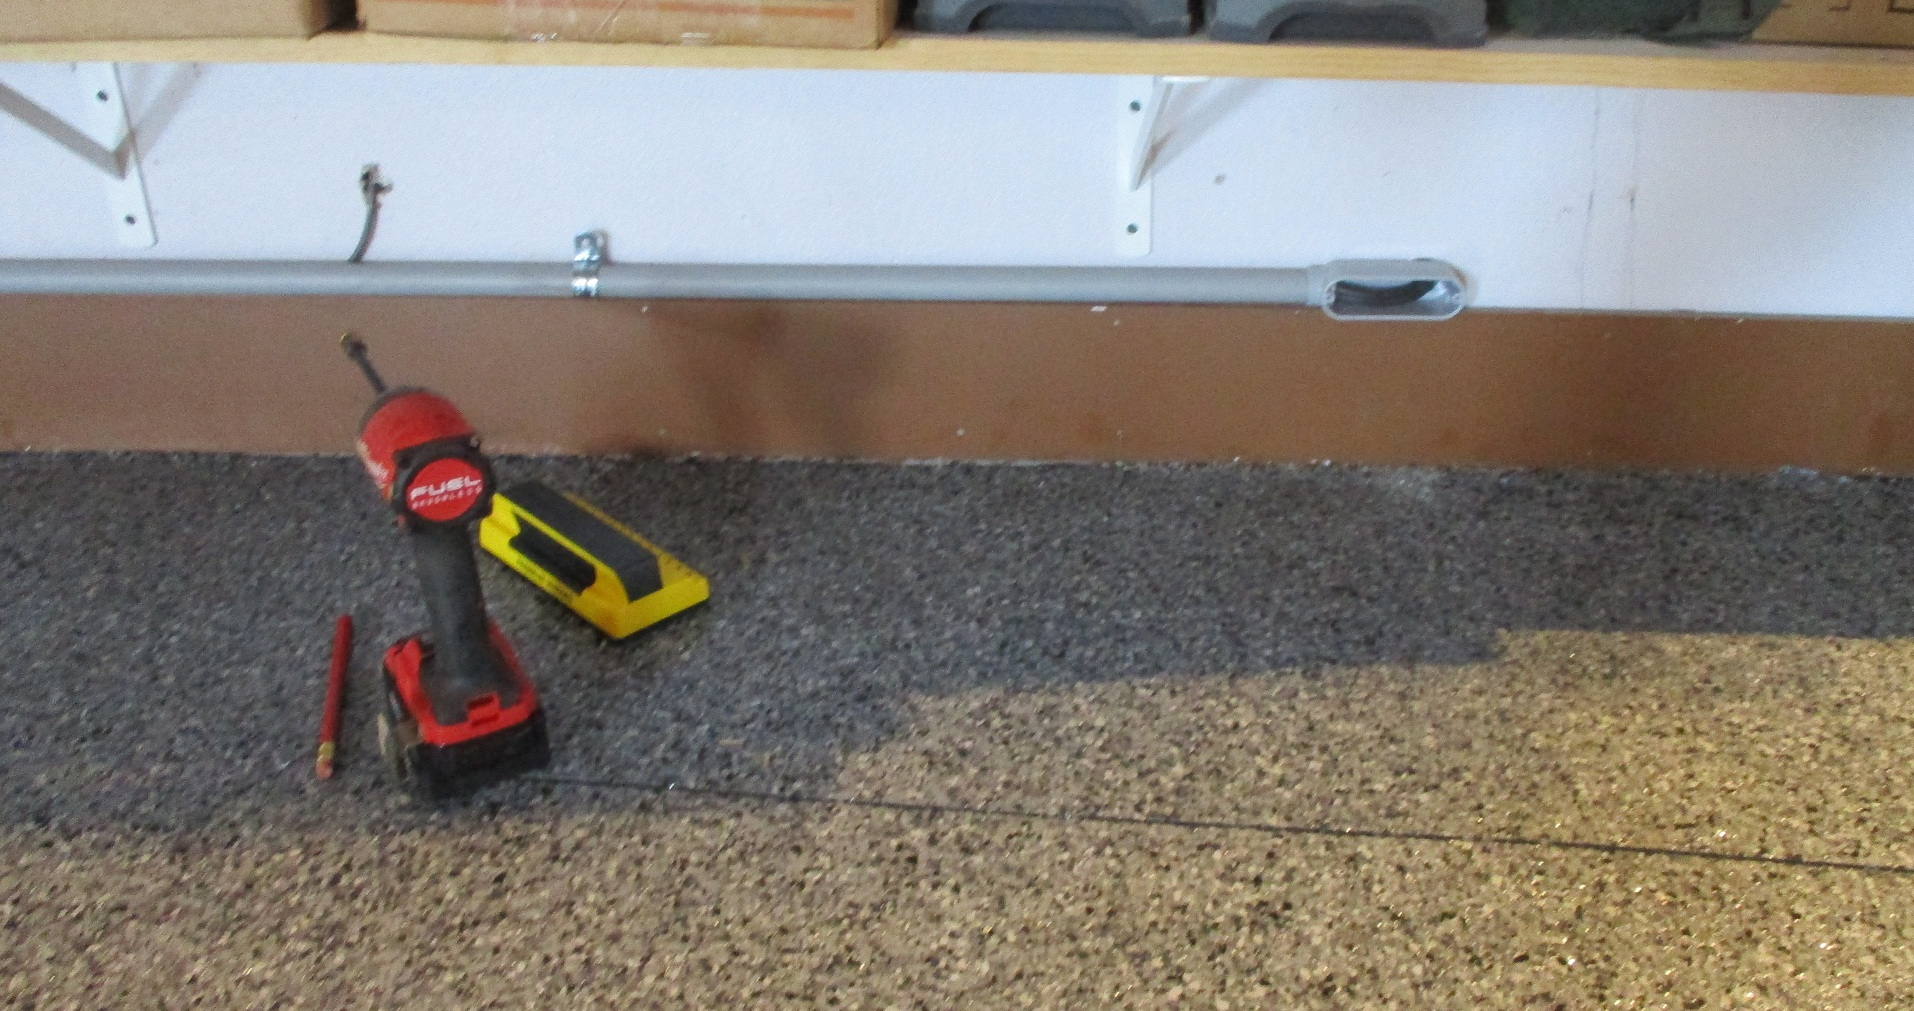
In this instance, the 240v cable was run in conduit under this power panel through the exterior garage wall and into the garage wall, just above the baseboard.
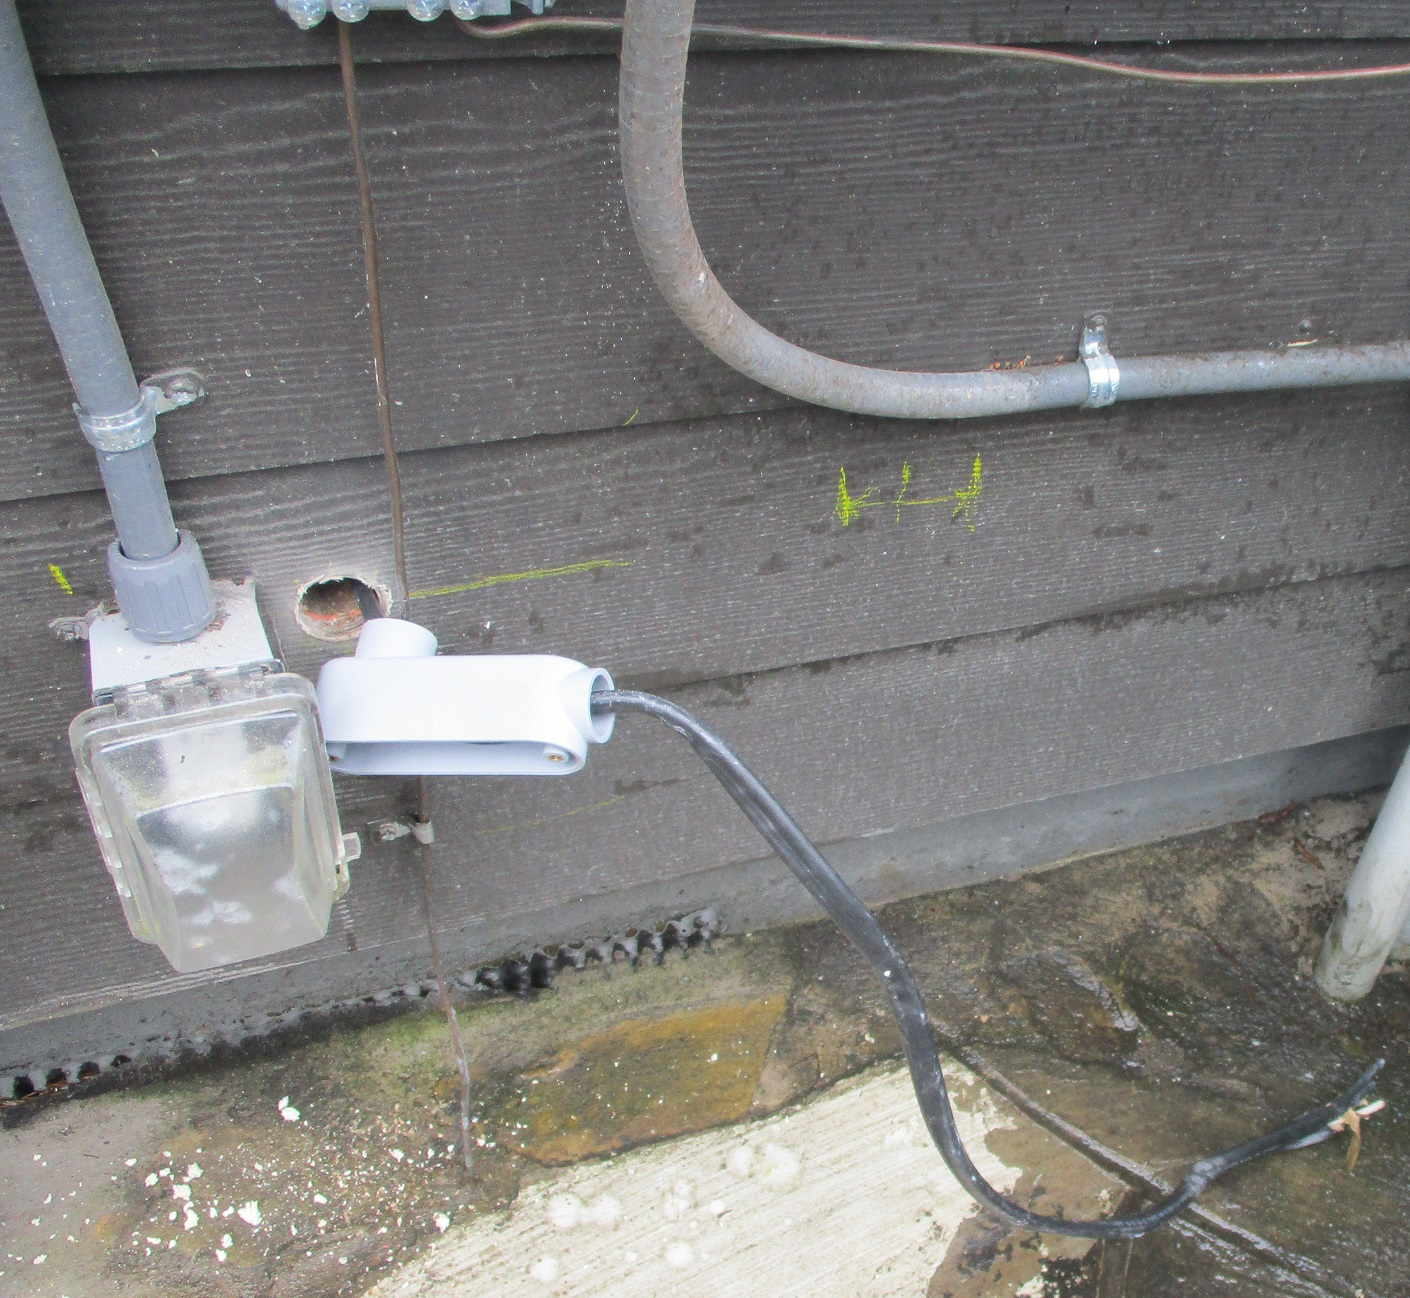
Then around the top of the baseboard (in conduit, per Code) to under the wallbox charger, then up and into the charger, where it was wired into the 3 power points: L1 (black), L2/N (white), Ground, in that order (verify yours with your Electrician and exact model of charger.

3. ADJUST THE DIP SWITCHES ON THE MICRO-CIRCUIT DELTA CARD INSIDE THE BMW CHARGER
There is a small diagram on the online instructions about this. THERE ARE NO PRINTED INSTRUCTIONS INCLUDED WITH THE CHARGER. And if you don’t know your 15 digit Google password offhand or have bad phone reception you’re going to have a hard time seeing those. The team ended up using the Architect’s desktop computer on the 2nd floor and taking a break so they could discover the secret to this next step. You must type into Google the exact model number of the charger you bought from your BMW dealer. The dealer won’t know what you’re about to be told in this online post: there are small switchblocks (2) inside your charger with 5 switches in the left switchbank and 6 switches (or possibly more) in the right switchblock. Your Electrician won’t have any idea what to do. Electricians that wire houses aren’t used to encountering computer micro-circuitry with DIP switches.
HERE’S WHAT THIS LOOKS LIKE ON THE 2023 BMW 61 90 5 A1E 1B3 WALLBOX. If you want to see the Delta manufacturer’s instructions you must type the above model number exactly, including with the spaces into Google to locate this online.

Now then, you will discover that the left switchblock should have ALL THE SWITCHES IN THE ON POSITION (UP) to be accessing the 40a power from the specified 40a breaker indicated on the right side of the wallbox. HOWEVER, YOU MUST TURN THE 1ST SWITCH OFF. Why: because, you will see in the instructions that BMW has preset all these on, and for reasons beyond the Architect’s imagination, they made this so the charger will not function unless you turn off this first switch. They say it’s preset to force you to use some complicated “APP” that compels you to use your phone in order to be able to charge your vehicle every darn time you want to charge it. In what anal-retentive universe this was conceived, the Architect does not know, but wants this requirement OFF. So: TURN OFF THE 1ST SWITCH (unless you enjoy entering 100 character passwords and downloading meaningless busy-work apps to complicate your day). This is the left switchblock indicated by the orange arrow.
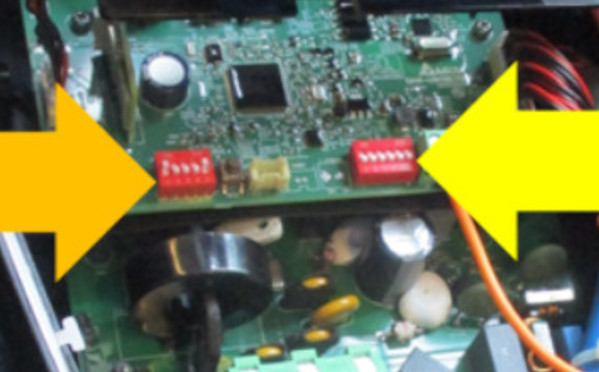
Above is a blowup of this. And no, the above DIP switches have not yet been adjusted per these instructions.
For the right switchblock (YELLOW ARROW) the BMW online wallbox instructions have all sorts of hard-to-understand possible settings for the 2nd switchbank. However, they come all OFF from the factory. Architect left them off. And after hours of trial and error, the settings above were discovered and THEY WORKED. Verify this with your particular charger box which may differ from this particular model number.
4. TAKING OFF THE FACEPLATES
This step should probably be indicated before the above step, but the Architect wanted to conclude the wiring circuit first. There are 2 faceplates that have to be removed to give your Electrician access to the inside of the charger.
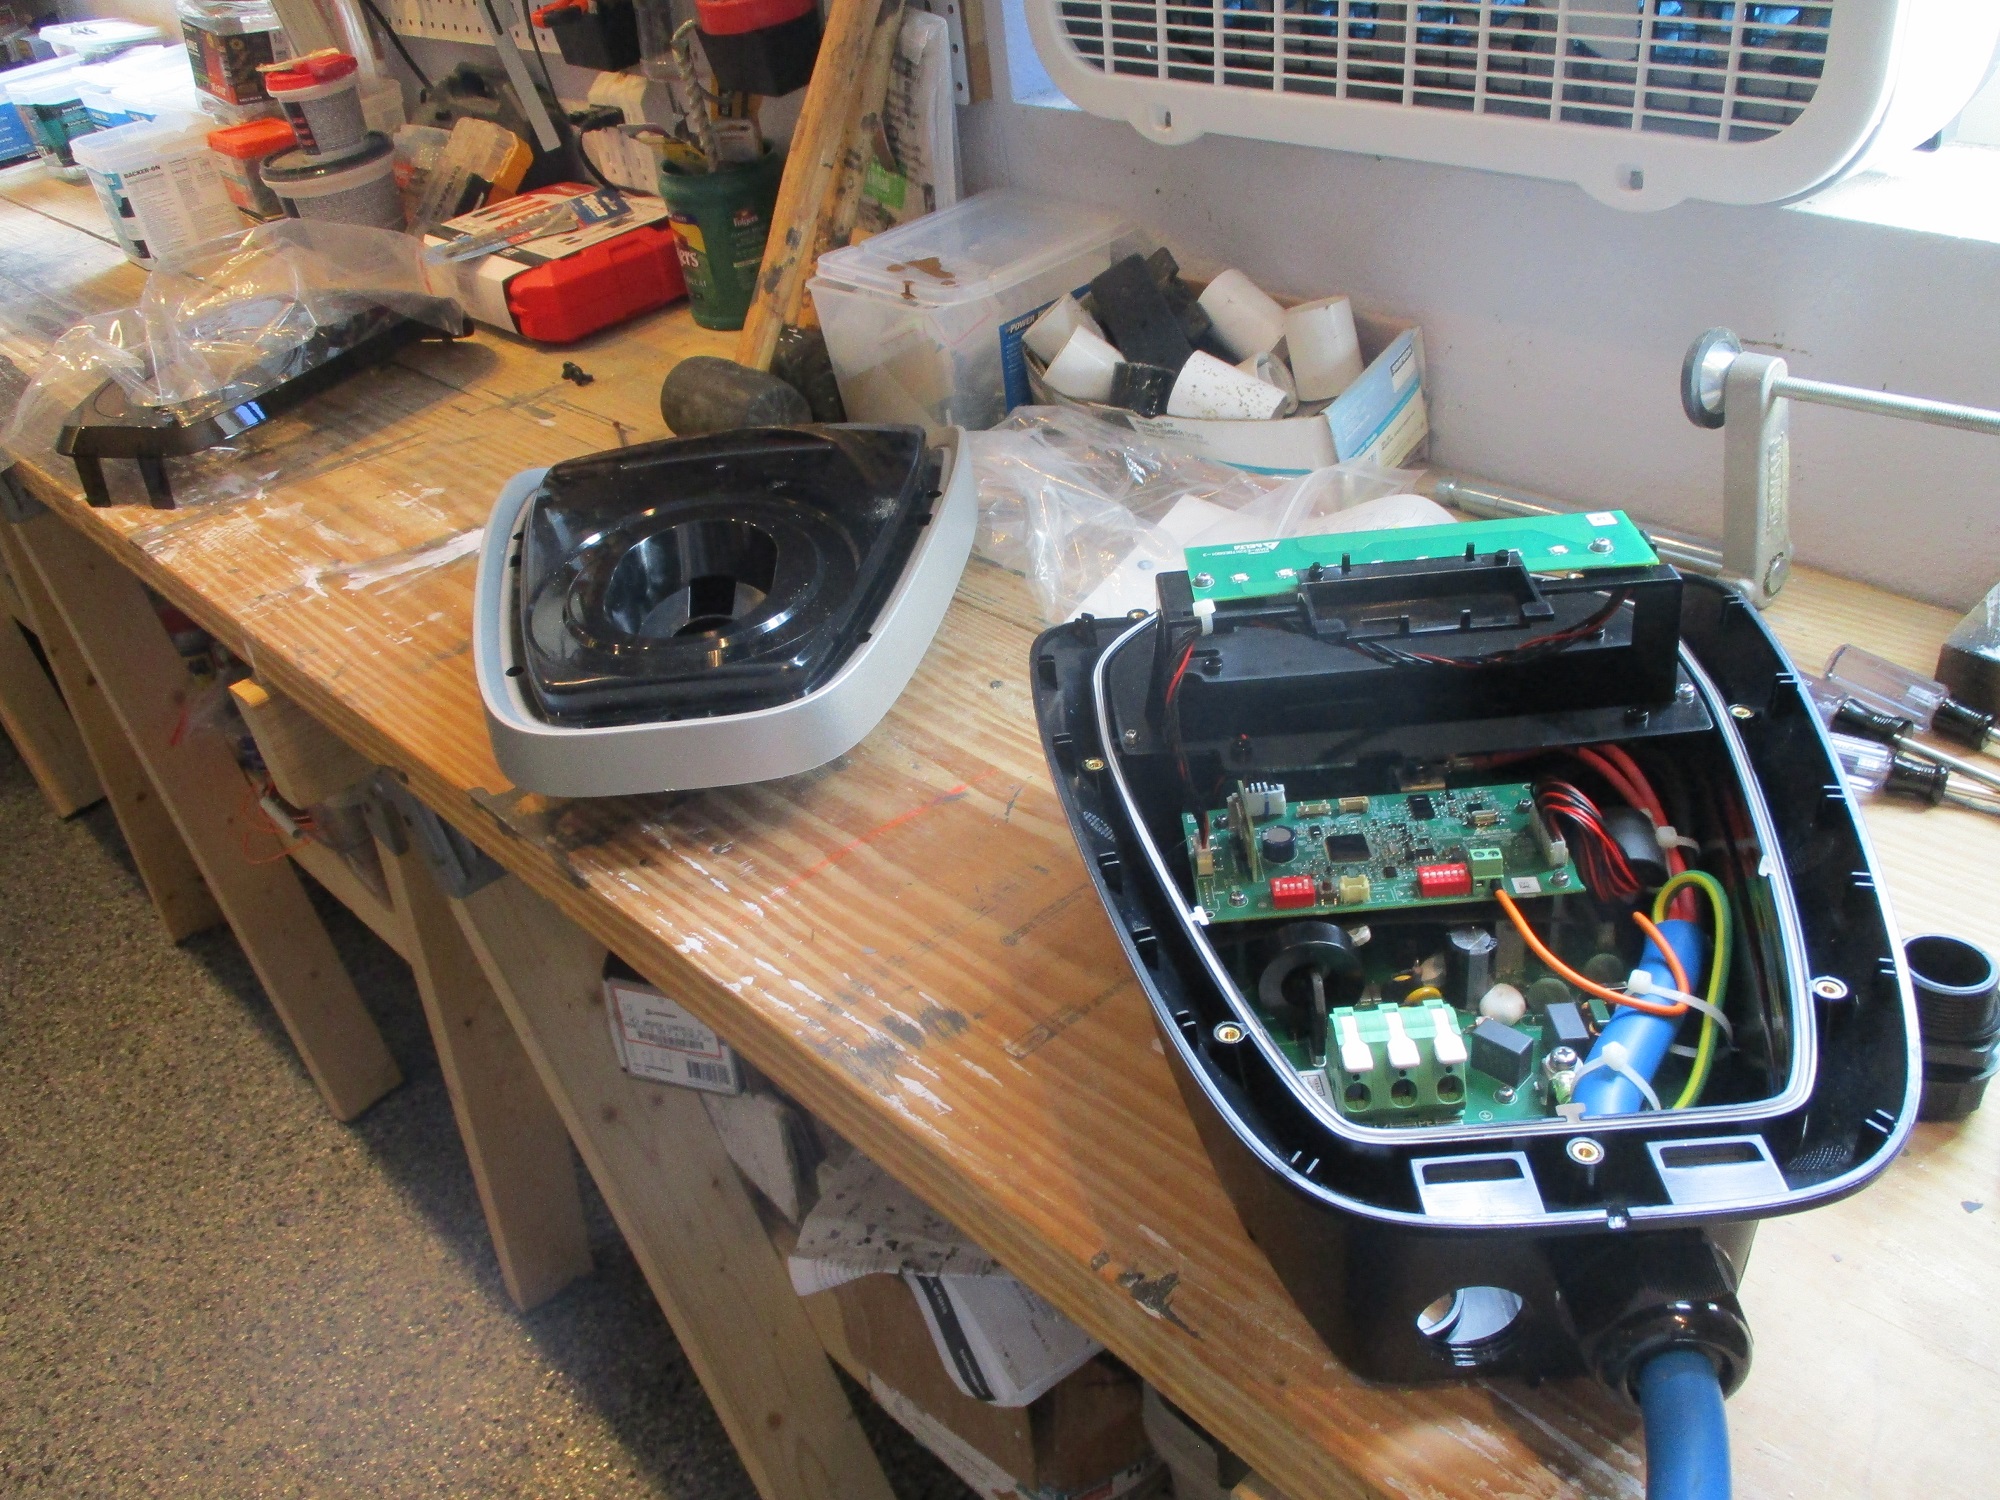
You can see the 2 faceplates to the left on this workbench, with the charger itself in the lower right.
The top coverplate is easy: there are some tension tabs with hubs that can easily be pushed and the plate removed. Take care not to scratch the plastic.
The 2nd faceplate is more challenging. It is held in place with star drive screws in deep sockets. You need to use a manual screwdriver to turn these loose and to tighten them later. Do not lose these screws. Do not use a power screwdriver. They are not very large and could easily fall to the floor.
The 3rd assembly you see above is the main wallbox charger with the internal circuitry exposed. DO NOT attempt to install the 240v wiring unless you happen to be a licensed Electrician. Once again, the Architect’s Electrician installed the 240v wires L1 (black) on the left, L2-N (white) center, and the ground on the right. It worked for this particular charger of this year and model number. Do NOT energize until all adjustments have been made and the faceplates reinstalled.
5. MOUNT THE WALLBOX CHARGER TO THE BACKBOARD
There are 3 side mount screws (star drive) that secure the wallbox charger to the black metal bracket that was previously screwed to the backboard. Mount that now (before energizing and before installing the faceplates).
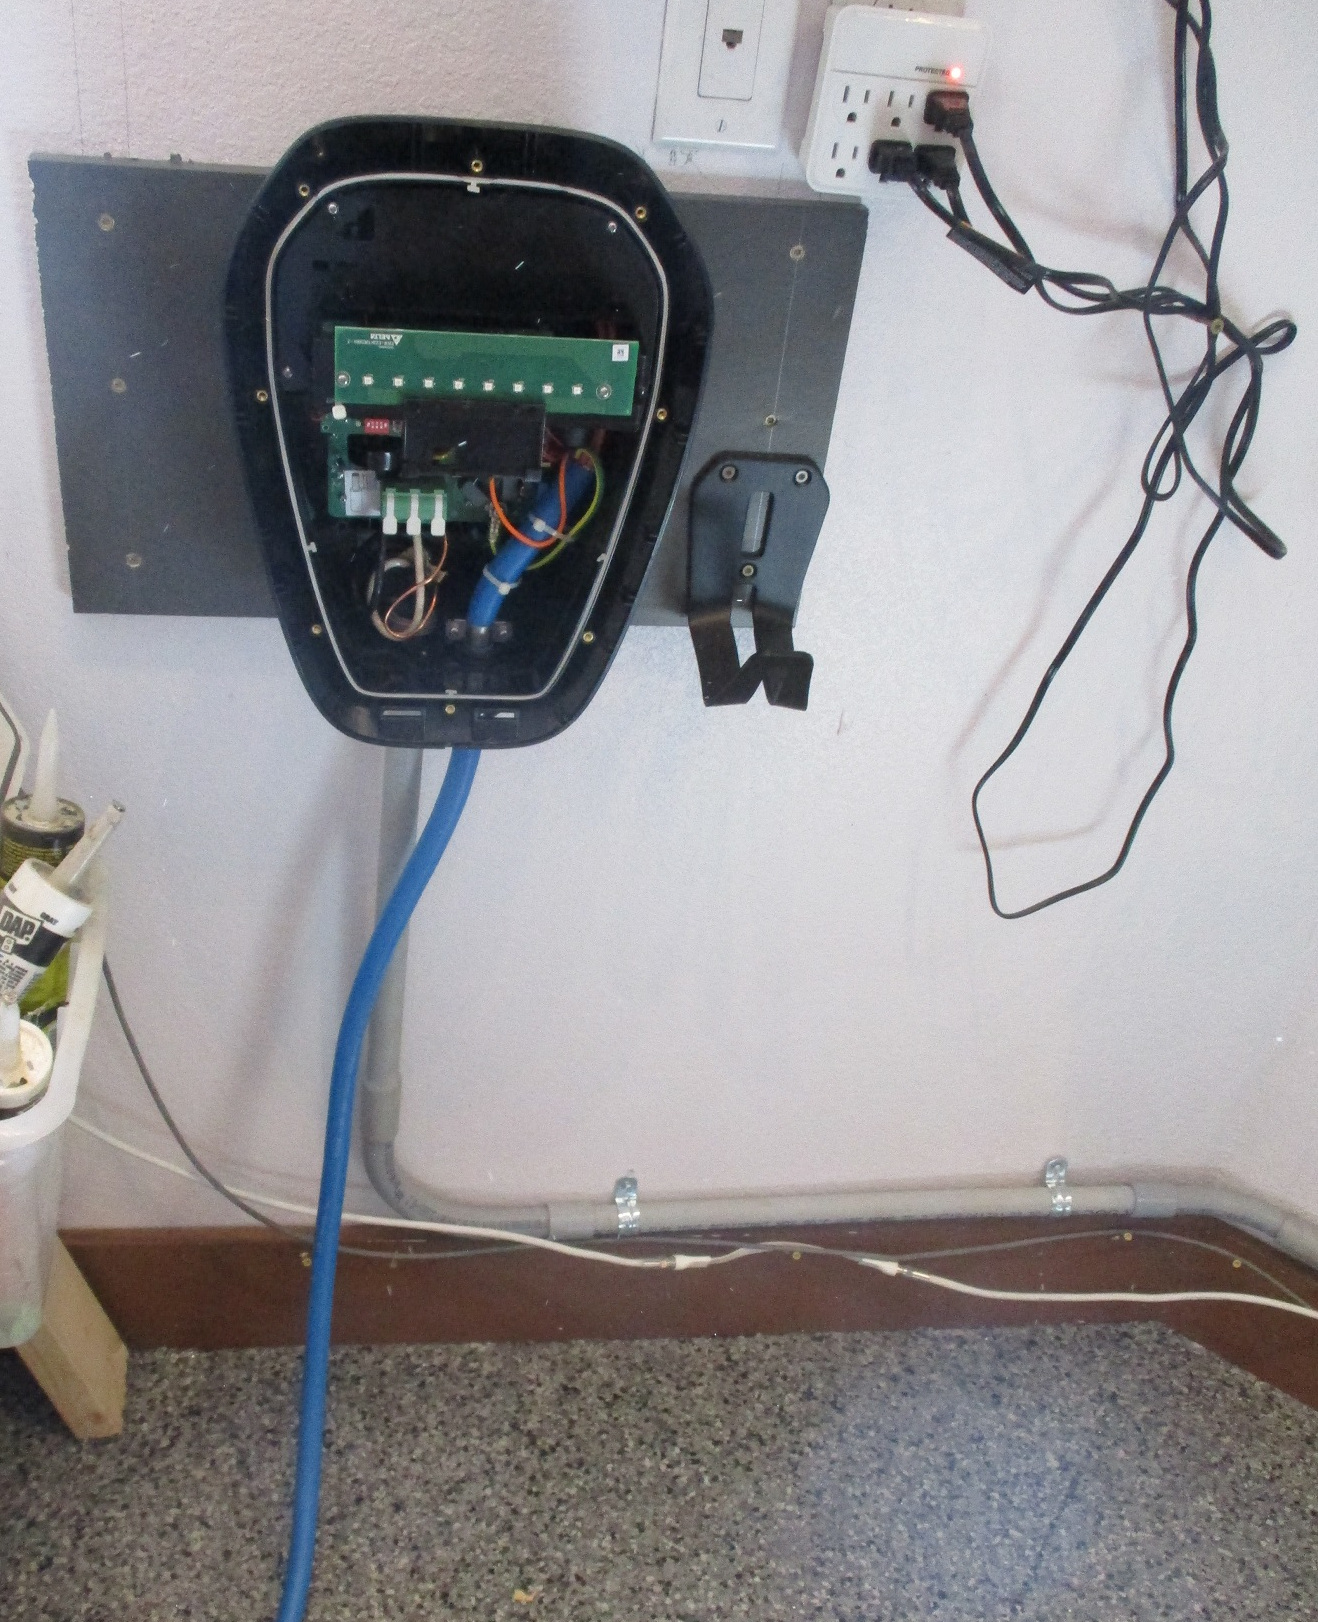
At this point, the Electrician may want to test the breaker to see that the wallbox charger is wired correctly and turns on. The LED blue light on the printed circuit board near the top of the charge should come on sequentially, left to right, blue.
6. REINSTALL THE FACEPLATES

7. READY TO CHARGE THE VEHICLE
How you know you got it right: if the BMW vehicle port pulses a blue light after you insert the charger into the port, within a couple of seconds. It may temporarily flash yellow. If the port shows a steady white light, something is wrong. You probably did NOT turn off the 1st DIP switch on the left switchblock inside the charger. If that’s what happened, take off the faceplates (after turning off the breaker), turn off that 1st switch, reinstall the faceplates and try it again. It should work. The blue light on the charger should pulse from left to right while charging the vehicle.
Good luck. And do not attempt to perform your own electrical wiring. Hire a licensed Electrician. Be safe.
8. COST
$625 for the charger from BMW (your cost may vary).
$1,139.50 Electrician labor and materials (your costs will vary)
________
$1,764.50 total