Smart Casework for Home Office is about how an Architectural firm designed the counters and support cabinetry for their Senior Architect’s own custom house.
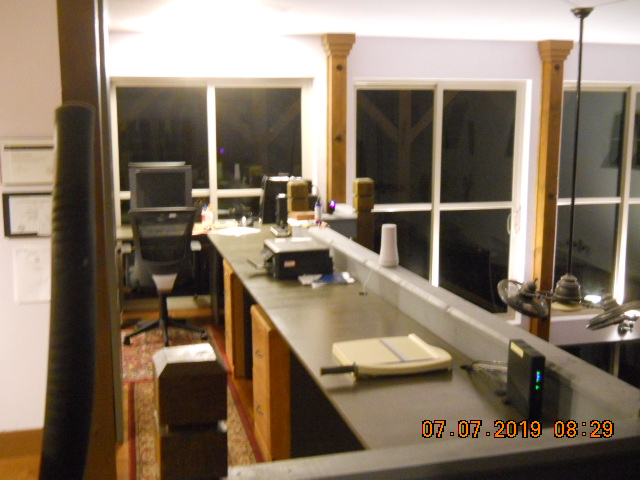
The photo above is the “reveal”: just part of the slick end result. Most of the other photos below show you how the Architect got to that end solution.
SUBSTRUCTURE
Below: Bitsy shows us the substructure that supports the counters:
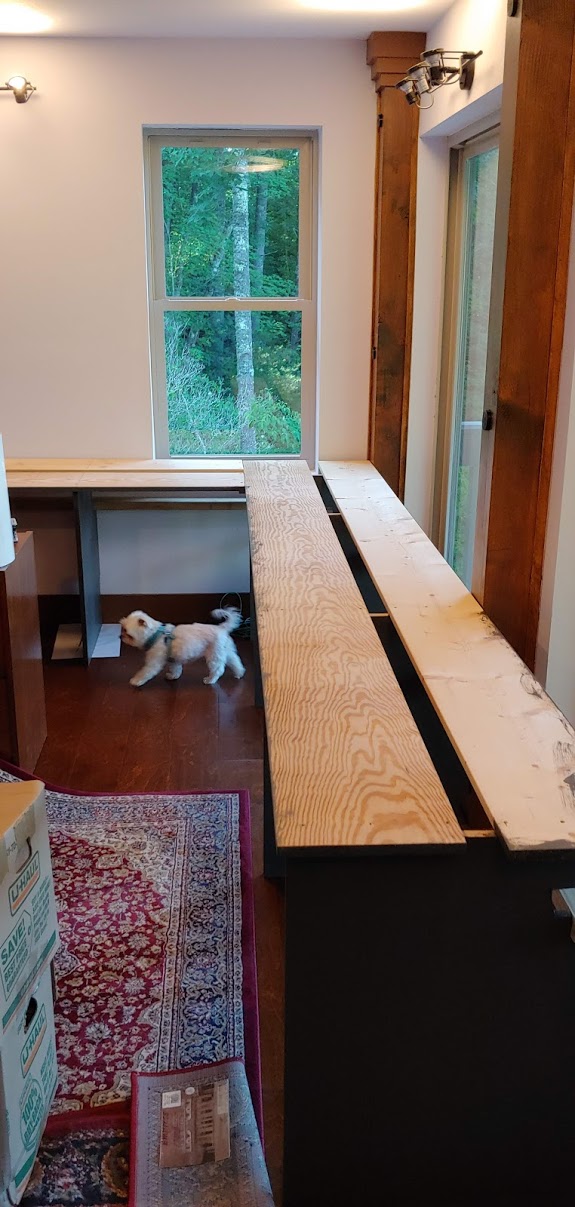
The Architect designed the vertical supports out of 3/4″ thick MDF (Medium Density Fiberboard), because he didn’t have much money left at this point in the project. He did have all the sub-counter boards he needed, however, plenty of long SYP (Southern Yellow Pine) and stud grade 1x12s and 1x10s. It is best to have them in unbroken lengths for each run of counter, if possible. Why: because broken lengths could result in uneven surfaces for the finish countertops. The 1x12s and 1x10s take screws well and hold on tight forever. The Architect chose to drill holes first, then use 2″ long lifetime guarantee star-drive deck screws to attach the sub-counters to the vertical MDF slabs. Note: while Home Depot says the MDF holds screws well, the Architect noticed that sometimes the screws cracked the MDF, so don’t try driving screws into it without drilling those pilot holes first. Also, don’t drive the screws in lickety-split. Use short bursts on the screw gun (Architect used a Porter Cable 20v cordless drill with #20 star drive bit (sized for the deck screws)).
Some other features of the MDF panels:
1. Very economical. Spent a total of around $193 for all the MDF used in the project, resulting in about 45 linear feet of 24″ deep counter, and 16 vertical slab panels supporting the counters. That’s a lot of material for a very low price.
2. No imperfections. MDF is perfectly flat with no gouges or other mars to the even surface.
3. MDF takes paint well and the paint lies level and even and the surface does not absorb much paint. It only used about 2/3 of a gallon for this entire home office project.
4. The MDF edges, after painting (factory edges and table saw cut edges) are an adequate exposed surface for medium grade cabinetry. Smooth and straight and no trim is necessary (IF you can cut it smooth and straight or only expose the factory edges).
(continued below):
5. Yes, MDF can hold a screw, but predrill the holes and take your time driving in the screws so you don’t crack the MDF.
6. There is formaldehyde in MDF. Make sure what you use inside your house has had adequate time since its manufacture to off-gas so you won’t be breathing those vapors.
The MDF “blades” or panels or slabs are approximately 24″ deep x 29-1/4″ tall (just a hair taller than most available 2 drawer file cabinets you can buy or order and assemble yourself. The support panels are 3/4″ thick. It is important to get the attachment screws for the sub-structure 1x12s and 1x10s exactly centered into the MDF slabs. Why: so you don’t spall off the top side of the MDF with a screw too close to the face of the panel.
WIRE RACEWAYS
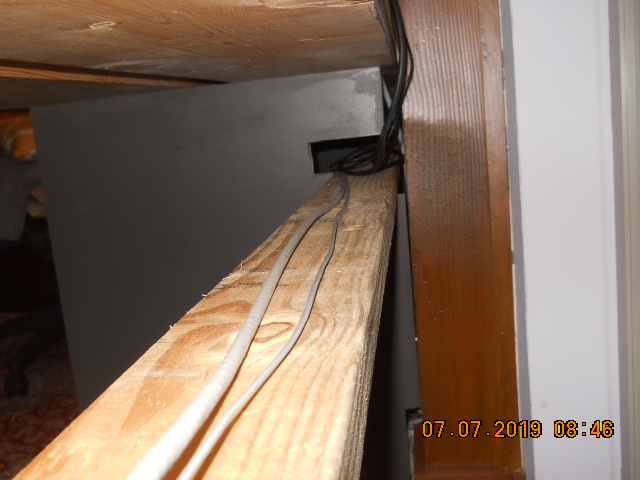
Raceways for wires are a critical element to “Smart” cabinetry and casework. Without them, today’s electronic wires will be running willy-nilly all over the tops of the counters and the floor is a disorganized mess (looking ugly and making it impossible to clean the floors). Much better to have the wires invisible, tucked away just under the countertops, toward the rear of the counters. In this solution, the Architect designed a 3-1/2″ x 1-1/2″ slot-gap into the rear of the vertical support panels, then installed 2x4s continuously into these slots and screwed them down into the MDF panels. He made sure the 2 drawer file cabinets (typically about 19-1/2″ deep from front to rear) would fit in front of these wire raceways, so the file cabinets would not interfere with the wires connecting everything. Notice that the slot for the the 2×4 raceway tray isn’t all you need. You still have to have space above that for the actual wires. The Architect made that space 2″ tall x about 5″ wide, so there would be plenty of room to fit fingers and wires to get from one side of each support panel to the other. Lots to think about.
WIRE MANAGEMENT:
WIRES? WHAT WIRES? WE DON’T NEED NO STINKING WIRES
Yes you do need wires. And lots of them:
A. Main incoming Internet wire. Usually in the form of a normal RJ11 phone wire with a normal phone jack on each end. This will usually come into your house in the form of a normal telephone receptacle. You have to connect this to the router your Internet provider gave you (or recommended) into the router’s main Internet connection port.
B. Category 6 Internet cable connecting each device you intend to be communicating with the Internet. This is often limited to about 4 devices, for instance:
1. Your main computer.
2. Your spouse’s computer.
3. Your main television device (such as a main Roku).
4. Other devices. If you get over this amount, you’re going to need something else. And these other devices exist. Talk to some knowledgeable Internet people.
C. Electrical cords for electrical power to your devices from electrical convenience outlets and from and to surge protectors and UPS (Uninterruptible Power Supply devices).
The idea: you manage the arrangement of your wires. You run your cords (cables, wires) along the wire raceways built into the casework, under the countertops.
COUNTERTOP ACCESS POINTS:
Often in the form of circular holes drilled into the countertops. In this case, a 2″ hole saw was used to drill through the countertops near the rear of the counters, above the wire raceway below them, for convenient access to the raceway, with wires coming from devices sitting on top of the counters.
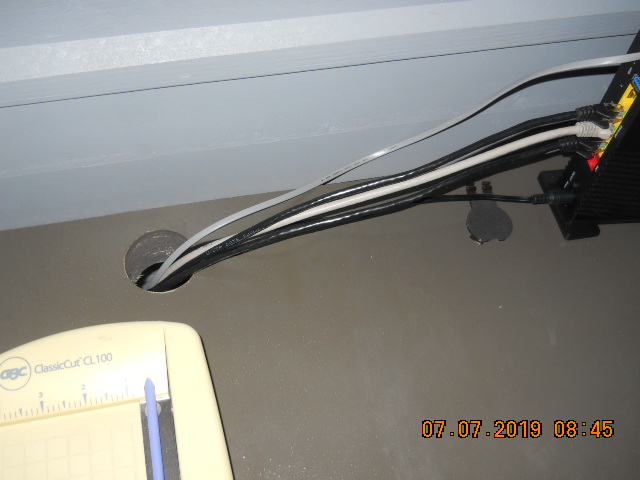
For instance: that’s the Arris router for this house’s internet system, sitting on top of the counter to the right. All those wires coming and going from it to the left are neatly handled going through the 2″ round hole in the counter nearby the router. Now isn’t that slicker than having those wire just running crazy all over the place in every direction? Makes for a much neater installation, and allows changes because the wires are tidy, making them easier to modify.
And as a finishing touch: higher end governmental and corporate interiors would have used a black plastic grommet to trim these wire holes in the countertops. The Architect didn’t have the cash, time, source, or money for those, so instead, he simply painted the hole interiors with the same color paint as the counters.
COUNTERTOPS
Wait for it…wait for it: can you guess?
Right: MDF. And the color: dark gray, matching the painted kitchen cabinets and other cabinets in the house. However, a painted counter would not be very durable and would scratch very easily. So, the Architect added 2 coats of clear polyurethane over the painted horizontal surface of the counters. Same polyurethane he used to protect the stained wood on his interior staircase. So on a counter, this should be adequately durable for a long time. Instead of using a brush, which could have likely left pronounced brush strokes, he used a 4″ roller. This produced “tiny bubbles” in the finish, that at first horrified him then his wife said: “that’s not so bad, I kind of like it.” It produced an uniform clear coat with tiny bubbles, each about 1/32″ in diameter. More like a textured plastic laminate, but obviously not. If you’re trying to duplicate the methods used and have access to spray equipment and can protect yourself, you might consider using that so the finish is smoother.

And looky there: Plenty of room for printers, computers, UPS, monitors, TV and other items for running a nice home office. See how the file cabinets fit under the counters flush to the front of the counters, but have space behind them for the wire raceways and 2″ holes in the counters? Can’t tell all those “smart” features are even there from first glance, can you? The overall appearance just looks neater and the floors uncovered with the typical snakes of wires. Pretty slick.
If you’d like a custom house designed for you with a home office with Smart casework like this, contact the Architect you see at the top of this web page.