Hard to believe that another fall is rolling around. It seemed like just a while ago we were entering spring and summer. What should you do to maintain your house for fall? 10 things are listed in this article.
1. CO and SD INSPECTION & TESTING
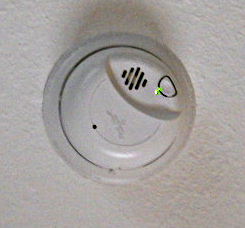
Click the image above to see residential architect website
Carbon Monoxide & Smoke Detectors should be tested. If you do not yet have CO detectors, consider having combination CO & SD units to replace your existing Smoke Detectors. If you do not have either, you are taking chances with your life and your loved ones. In the middle of the night, a smokey fire could kill you and yours either through CO poisoning or the fire itself. And if you have a gas fireplace, gas hot water heater or gas furnace, your CO detectors can tell you if those appliances are emitting unsafe levels of Carbon Monoxide. You really cannot test these devices too often. Certainly at least once a quarter, but beware of units that are not mainly powered by the house main power supply. Almost all CO & SD units have battery back-ups (which should be replaced regularly), but if the devices in your house are solely powered by batteries, you will have to be much more observant and pay attention to “low battery chirping” of the devices and replace them as required to insure that they have power to do their monitoring job for you. Clean away any spider webs, which are responsible for some false SD alarms. Do not erect ladders and perform the testing for yourself, unless you are an able-bodied person and have another person nearby to stabilize the ladder. Even then, this can result in dangerous falls that can injure you. Rather, have others who are specialists do the testing for you.
2. GAS APPLIANCE INSPECTION
Click the image above to see home inspection website.
If you have gas appliances like a gas stove, gas hot water heater, gas fireplace and a gas furnace, have a qualified gas co
mpany representative examine them. For instance, when a qualified technician sees a yellow flame in a gas furnace, he or she knows that there is a problem: the unit is not efficiently burning the gas and the result is not only less efficient use of your expensive fuel, but by-products like Carbon Monoxide. With the coming cooler temperatures, you will be using each of these gas-fired appliances more and that means that those gas-burning sources may need to be adjusted to insure fuel efficiency and safe combustion of the gas. Carbon Monoxide is created through incomplete combustion. Have these devices inspected at the rate suggested by each device’s ownership and factory maintenance manual.
3. ENTRY DOOR THRESHOLD INSPECTION, ADJUSTMENT AND REPLACEMENT
Click image above to see Green Home Architects index.
One of the things most people overlook is the little gaps under the bottoms of your exterior doors. Your expensive heated air can be leaking to the outside world, wasting your money and increasing your monthly power bills. Also, bugs can easily crawl through these cracks, enter your house, contaminate your food, bite you and your pets and make life unpleasant. Better to keep them outside. How do you do this? For one thing, get down on your hands and knees and take a look from the bug’s eye perspective: check out the bottoms of your exterior doors. When these exterior doors are closed, can you see directly to the outside? If so: your threshold weatherstripping is either missing or in a state of disrepair. As the temperature drops outside, creepy crawlies move around and move to where the temperature is warmer. If you have your heated interior air leaking to the outside from under your exterior doors, it is natural that they would be attracted. So: if you can see directly through to the outside and you have no threshold weatherstripping, contact a local licensed Contractor and ask him or her to come over, examine your situation and then obtain and install a proper threshold that contacts your threshold and seals the inside from outside access. Often, these threshold weatherstrippings are made of vinyl blades about 1/16″ to 1/8″ thick, sometimes with multiple flexible blades about 1″ or so long. When installed correctly, the blades contact your door threshold and prevent both your interior heated air from leaking to the outside (so that you will pay less on your monthly power bills), they also can block most of any unwanted entry from bugs and other wildlife that you’d prefer to leave outside. Some of these weatherstrippings come as part of the door bottom, or are attached in a manner that is not easily replaced while your door is hanging on its hinges. This could require that the door be removed from the hinges and placed on a flat surface so that the bottom is fully exposed and allows the old threshold to be removed. Once the old threshold is removed, the new threshold can be installed. See this video for guidance: removing door and installing door bottom weatherstripping. This is for those doors that have a double barbed vinyl insert stab-lock set into two grooves in your door bottom, as is often the case these days. Here is another link to instructions about this type of replacement: Replace worn out threshold weatherstripping. There is another means to installing door bottom weathestripping, using side-mounted hardware, called a door sweep, that does not involve removing the door from its hinges. See this video for information about this: installing door sweeps.
4. AIR-CONDITIONING INSPECTION
You will still likely be using some air-conditioning during the day and heating possibly at night. There is a drain pan under your AHU (Air Handler Unit). Have this inspected by a licensed HVAC technician. There should be a hard-piped drain line that drains this to the exterior. Also, there should be an alarm switch connected to the drain pan that alerts you if it is about to overflow. There should be a hard-piped condensate line running from your AHU to the outside, without connecting to anything else. Any drainlines going to the outside should have at least an 18″ long horizontal extension (to keep the steady dripping water from undermining your footing). The condensate drainline should have perhaps a half a cup of household bleach run through it twice a year, to keep mold growth inside the pipe from clogging it. Check with your HVAC company to verify reaction of your piping to the chlorine in the bleach. Let a skilled tradesperson do this for you. Make sure that your HVAC condensate line has a quality wrap of synthetic insulation around it, at least 1/2″ thick, to prevent water in the atmosphere from condensing on the cold pipe and dripping on your floor/structure. Have licensed HVAC people do these things for you. It is suggested that you have these same HVAC pros examine your exposed ductwork for gaps. Aging duct tape can permit large amount of your expensively treated air to bleed out in crawlspace and other locations. Have the HVAC pros use today’s higher quality foil tape to seal all cracks in ductwork and have them examine your AHU to insure that it has gaskets sealing it tight. Your HVAC system will be much more efficient and you will save $$$ on you monthly power bills. Have the outside HVAC equipment inspected. Make sure that the exterior equipment is at least 3″ higher than the surrounding ground and placed in a manner so that water flowing on the ground will not contact the equipment. Remove any debris from outside equipment. It is not a bad idea to wash and wax the exterior surfaces of heat pumps and the like, to keep them from corroding.
5. AIR FILTER REPLACEMENT

Click image above to see Indoor Air Quality article.
If you are like many people, it has been months or even years since you replaced or cleaned your air filters. Most manufacturers suggest that you do this every 3 months. Using a high performance filter level of 1500 provides you with better filtration of your air and having the filters be electrostatically charged does a better job of filtering the air that goes into your lungs. If you are in a new house, your builder probably installed a less expensive low-performance blue-colored filter in your R/A (Return Air) grilles. Replace them immediately, to remove the construction dust that is probably all over them. Also, using a clean white cotton absorbent cloth, spray the cloth with a 50-50 solution of household bleach and water and reach into the R/A housings and ductwork and remove any and all of the construction dust and debris you will find there. Most houses are not built with any concerns as to protecting and commissioning ductwork and HVAC equipment, so yours are probably contaminated. Removal of construction dust will immediately improve the air quality in your house. If you are subjected to any hazards when opening R/A grilles, engage a qualified and licensed HVAC contractor to do this maintenance for you. Indoor pollutants can be 2 to 5 times higher than outdoor levels and indoor air quality ranks as one of the top five risks to public health. Using a better, new, clean air filter can help clean the air in your house by reducing the particles from the air that pass through the filter.
6. CONSIDER PURCHASING A STAND ALONE AIR CLEANER
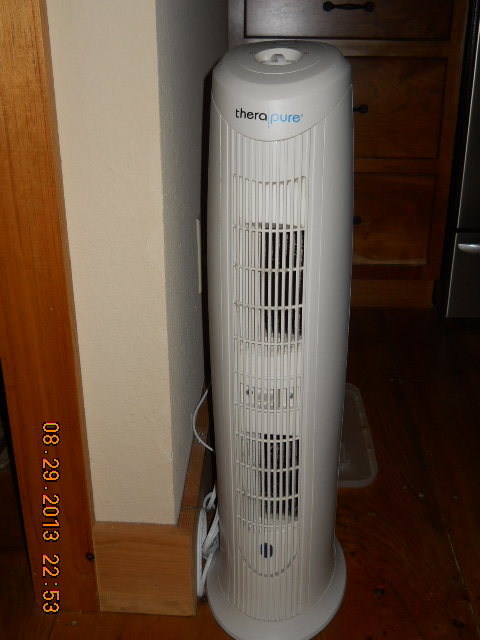
Click image above to see Another indoor air quality article.
These units can stand anywhere you place them, preferably near the center of the house and you may want to have several. The are fairly simple. An interior fan draws air through the rear, where the air from inside your house passes through a filter, then the cleaned air may pass by an ultra-violet light to kill living organisms in the air stream, then the treated air is pushed into the space from the front of the unit. These can typically be purchased for $100 to $200. The filters should be cleaned and/or replaced perhaps once a month. You will be amazed at all the dust and debris that is caught there. You take this dirty filter outside to clean it, or replace it with a new filter. The first time you are shaking all the dust from this filter, you will likely be thinking: “I’m so glad I got this thing. Otherwise, I’d be breathing all that stuff.”
7. WINDOW & DOOR WEATHERSTRIPPING
In addition to item 3., also have specialists examine and repair weatherstripping around all your doors and windows to insure a tight seal when closed. You will save over $1,000/year, according to some industry figures, that could be otherwise wasted due to infiltration (unwanted air leakage into and out of your house).
8. GUTTER PROTECTION
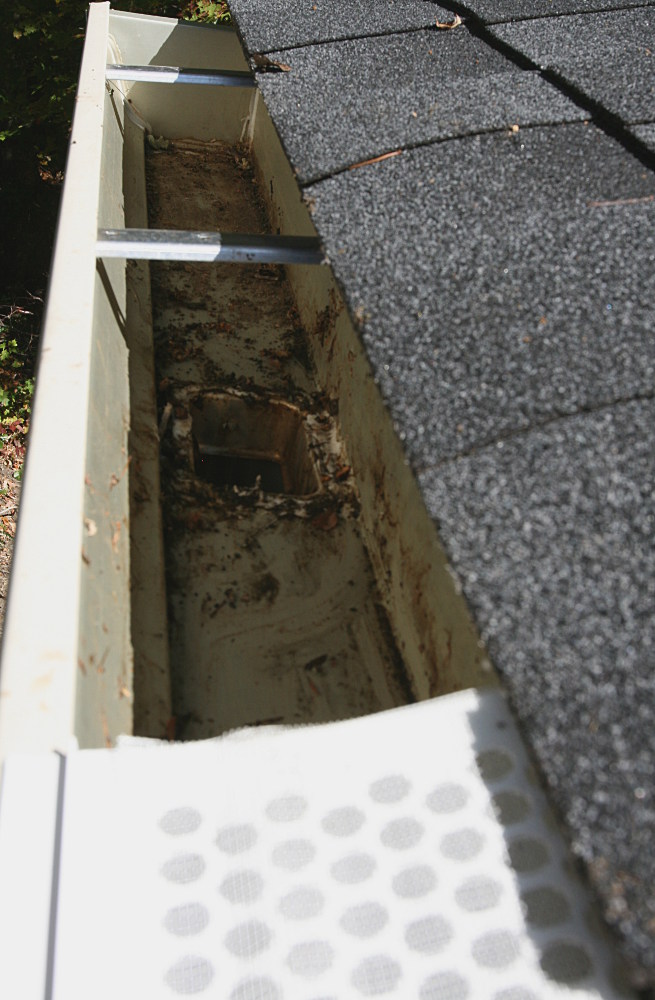
Click the image above to see Gutter Guard article.
Have a qualified gutter and roofing contractor examine your gutters and have simple, inexpensive and reliable gutter guards installed to keep debris from your gutters. One of the most effective types is depicted here, which easily snaps into place in standard 5″ to 6″ seamless rectangular gutters. Unfortunately, expanded mesh gutter guards normally get swept off the roof during winter with cascading ice and snow sheets tumbling from your roof (if you are in a snow climate). You need gutter guards that will remain locked into place. It has been our experience that monolithic types of gutter “helmets” tend to allow fast moving sheets of water to overshoot your gutters, rendering them ineffective at handling the water coming from your roof. Simpler is better here, and less expensive. And while you’re at it, make sure that each and every gutter connects to an underground plastic drainage pipe, using manufacturer’s fittings, attached to the bottom of each Down Spout. These underground pipes should be taken to at least 20′ down and away from your house, on the down slope side, so that none of the water coming from the gutters and downspouts can flow toward your house.
9. HOSE BIBBS AND HOSES
This one is easy. Before the first freeze arrives, disconnect all of your exterior hoses from your exterior hose bibbs. Keep them disconnected until next spring. Drain the hoses of all water. Make sure that the hose bibbs on your house are the frostproof type with a vacuum breaker. If not, have them replaced by a licensed local plumber. Many people do not realize that having an old-style non-frostproof hose bibb is one of the main reasons for winter plumbing freeze breaks and often flooding of wall interiors and the house. This is so simple to prevent, by having the right type of hose bibbs.
10. DEHUMIDIFIER, CRAWLSPACES, ENCAPSULATION
If your crawlspace is Not “encapsulated”, give serious consideration to doing so. You can see more information about this here: encapsulating crawlspaces. This treatment entirely wraps the earthen floor and concrete walls of your crawlspace in vinyl or plastic, turning it into a clean space, instead of an uncontrolled zoo for creepy-crawlies and dampness. In this process you seal off all exterior air vents, so that arctic air will no longer blow under your feet during winter. Also, you have a full-time automatic dehumidifier in the crawlspace, set to about 40% to 50%, which keeps the atmosphere much drier down there and less prone to allow organic things to grow, which = healthier for you. Also, you save energy, because the crawlspace is now contained. The dehumidifier should be hard-piped to the exterior, with the outlet at least 18″ horizontally from the exterior face of the foundation wall. You will be amazed at how much “nicer” and cleaner your crawlspace becomes after encapsulation. You may even decide to expand some basement space down into that area. You will also experience much less intrusion from insects and other pests. Where, before, you allowed uncontrolled access of your house to anything capable of burrowing up into the crawlspace from the ground, you have now totally contained it in a plastic perimeter defense system that stops just about anything. And, you should also experience lower power bills, because your Heating and Air-Conditioning won’t have to work as hard, because you have drastically reduced the moisture in the house, not to mention, improved the air quality.
For further information on how to have an Architect design your home with features like the above, please contact: Rand@HomeArchitects.com Or see: www.HomeArchitects.com
tags: fall house maintenance 10 things to do, custom, post and beam, timber frame, cashiers, atlanta, hendersonville, asheville, highlands, glenville, sapphire, aspen, telluride, canada