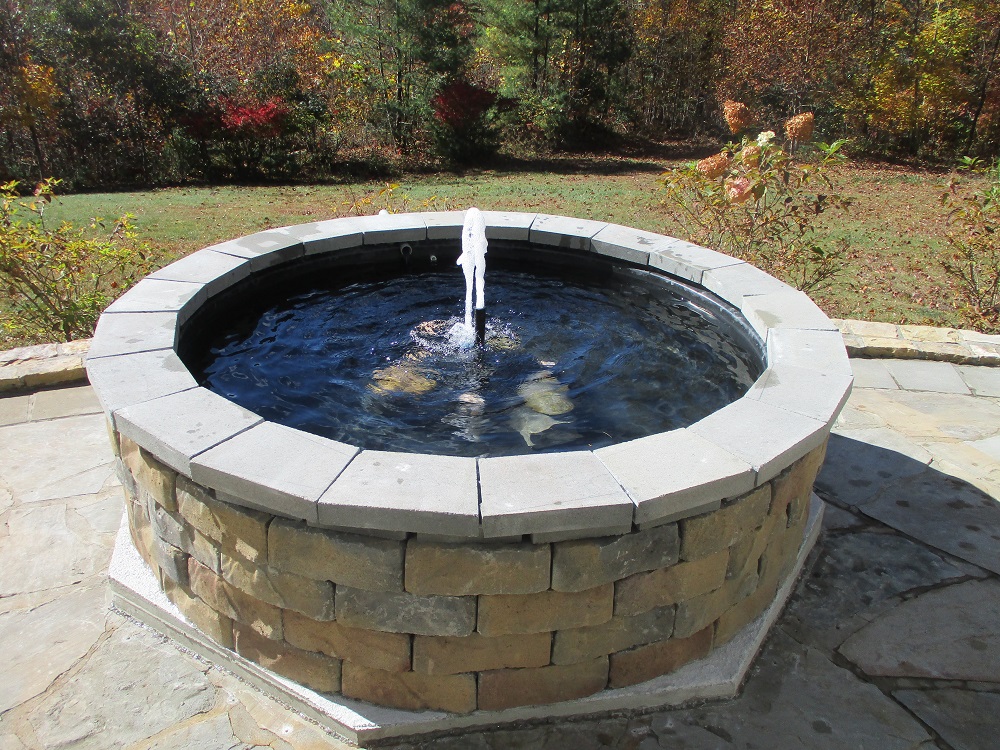
Fountain at Patio is about how this Architectural company designed and physically built a custom fountain on the Architect’s own patio for him and his Realtor wife.
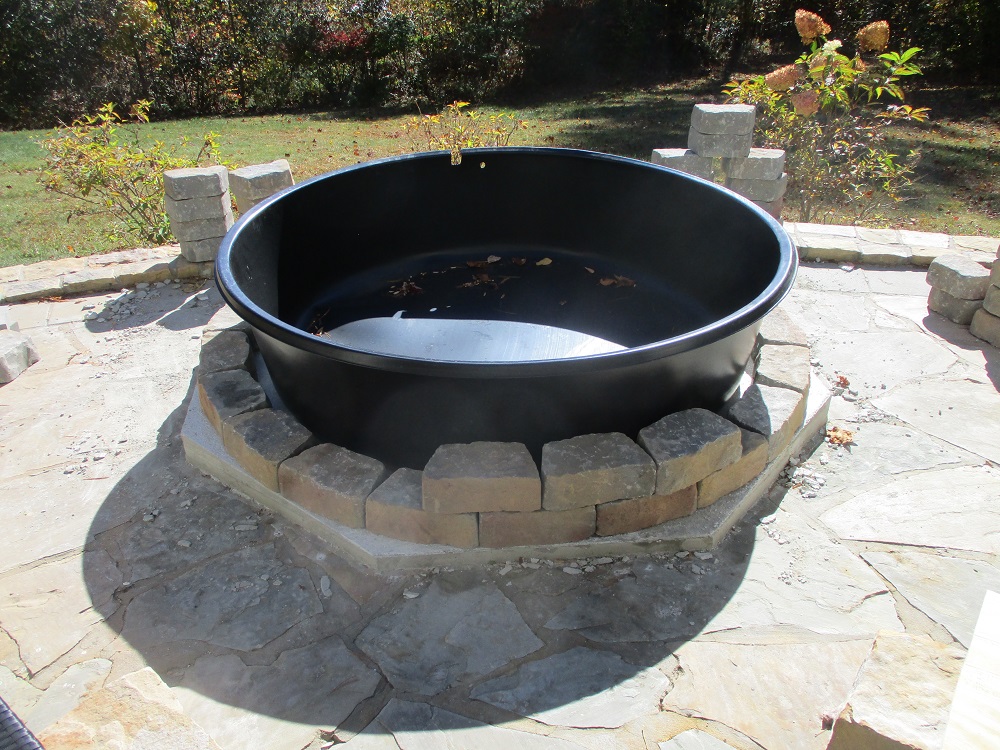
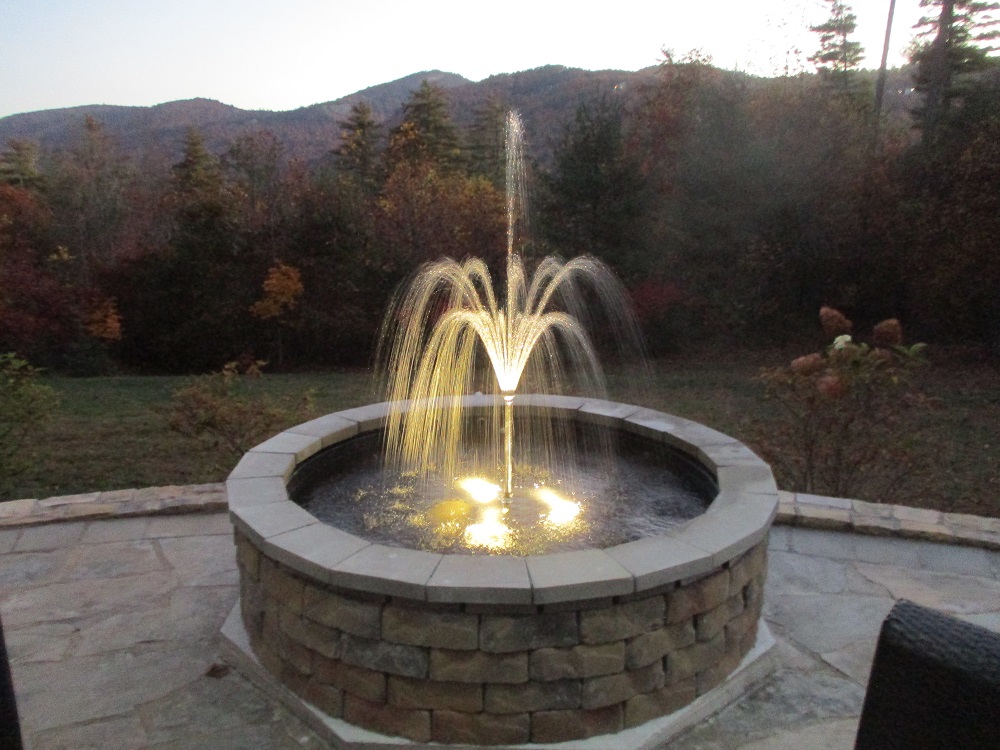 Above is the final result.
and below, how it was designed and built.
Note: the Architect would have hired the labor to be done by professionals, but he got a quote of $7,000 for only the labor. This was more than double what he felt was reasonable, especially for such a small basin. So he decided to do this one himself (which he really did not want to do).
First, the Architect decided where the fountain would be located, and what it should be aligned with, and what its size and shape and height would be. And from what readily available components it would be made. He drew his design arrangement on his computer. This became the place to obtain the answers for dimensions and angles in the field.
For instance: it became obvious that the fountain would be a circle, because the fountain basin comes round as one black plastic piece. And it was felt the sub-base under this needed to be an octagon, because a circular concrete platform would be to difficult to form. And there did need to be a concrete sub-platform formed out of concrete, because the patio flagstone surface is sloping. And fountains don’t work well on slopes. The water in them needs to be level, which means the basin needs to be level.
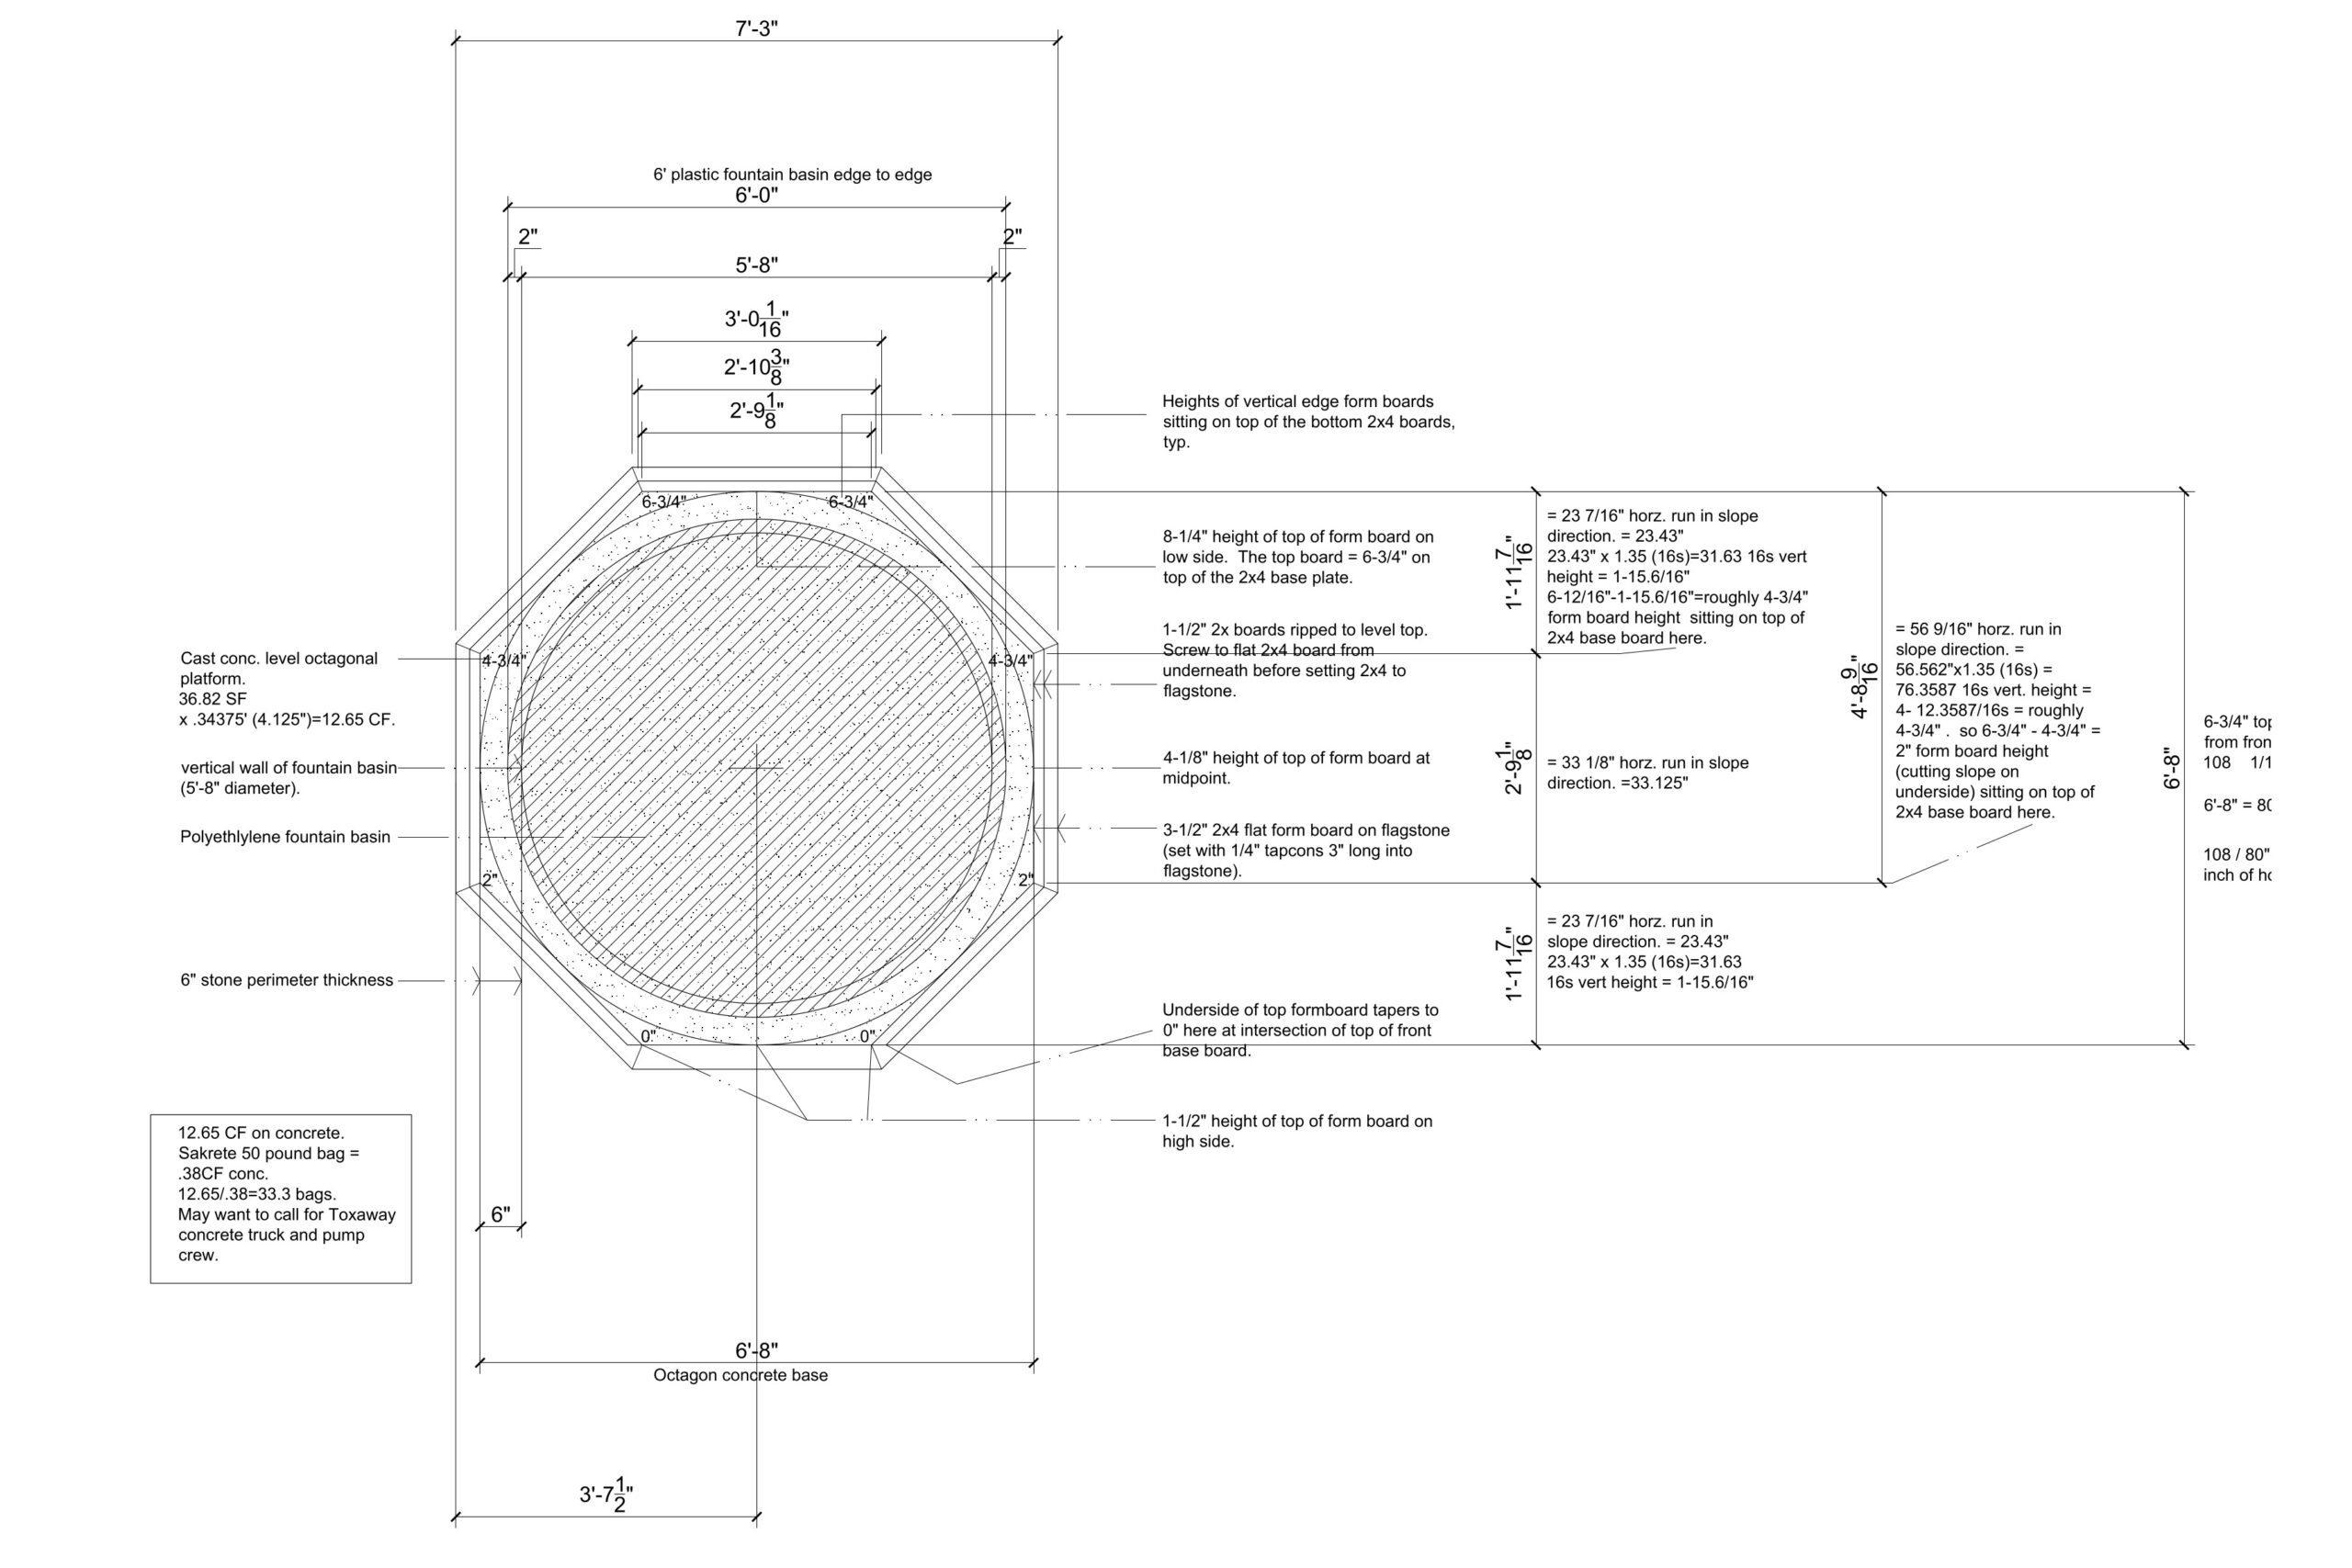
Next, the Architect bought more than enough colored concrete blocks of a special trapezoidal size and shape (Lowes). These were gray in color. πD helped determine the perimeter, then x the height. The Architect unloaded these on the patio (144 x 25 pounds a piece= 3,600 pounds, in two loads), then went to a local paint store than had the capability to match colors and make this special color paint, then inject it into a pressurized spray paint can. So the Architect had the paint store match the special color of the existing Tennessee field stones from which the nearby firepit had been built several years before. Then lightly sprayed this onto what would be the exposed front faces of the newly purchased concrete stones, in effect turning them into a similar element of masonry visually close to the TN fieldstone. The Lowes colored concrete stones were selected for the side wall of the new fountain, because they are gauged. This means that they are all the same height. This greatly simplifies the construction and also makes it possible to “glue” it together using a durable sealant such as Sashco Lexel. This is not a construction method to use for anything but short, minor items.
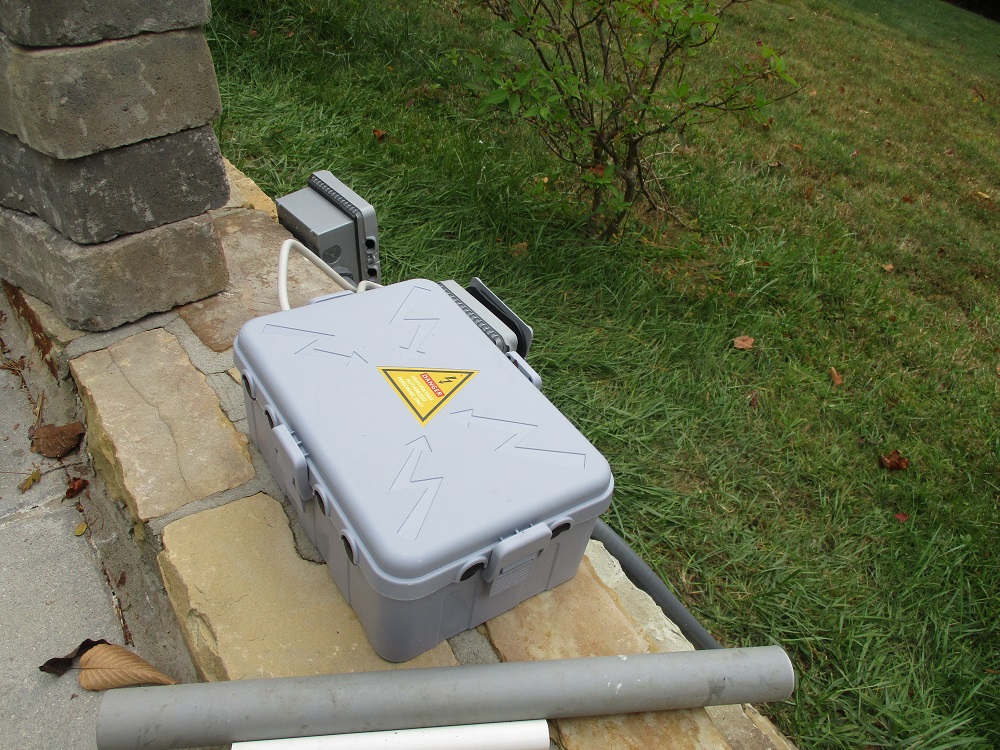
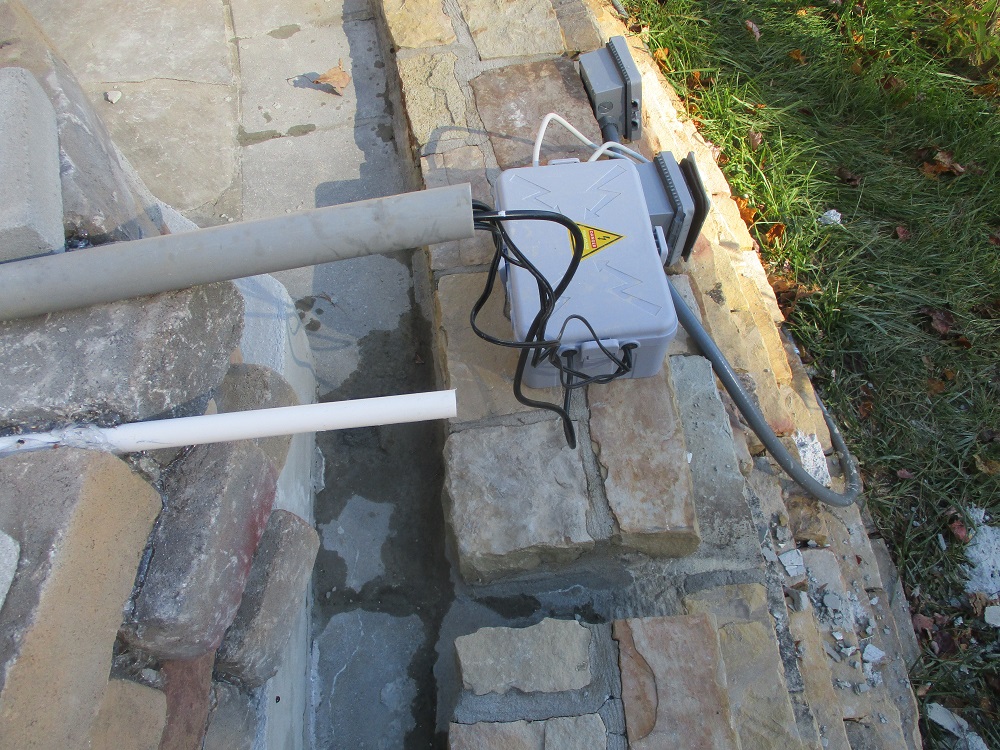
While this was going on, the Architect hired a licensed Electrician to install a new power line from the existing crawlspace out to the patio, down and underground in conduit around the patio, to the south end, then connect the new wires to two 4 gang outdoor convenience outlets, wired to a new GFCI breaker in the panel inside. All of this was also wired to and control by 2 new exterior grade on-off switches so the Architect could turn the new fountain pump and underwater LED lights on and off. The water-resistant connector boxes you can see below.
Then, the Architect dry set the stones into a circle, approximately the diameter of the black plastic fountain basin, so the stones would snugly fit around the basin after they were permanently installed.
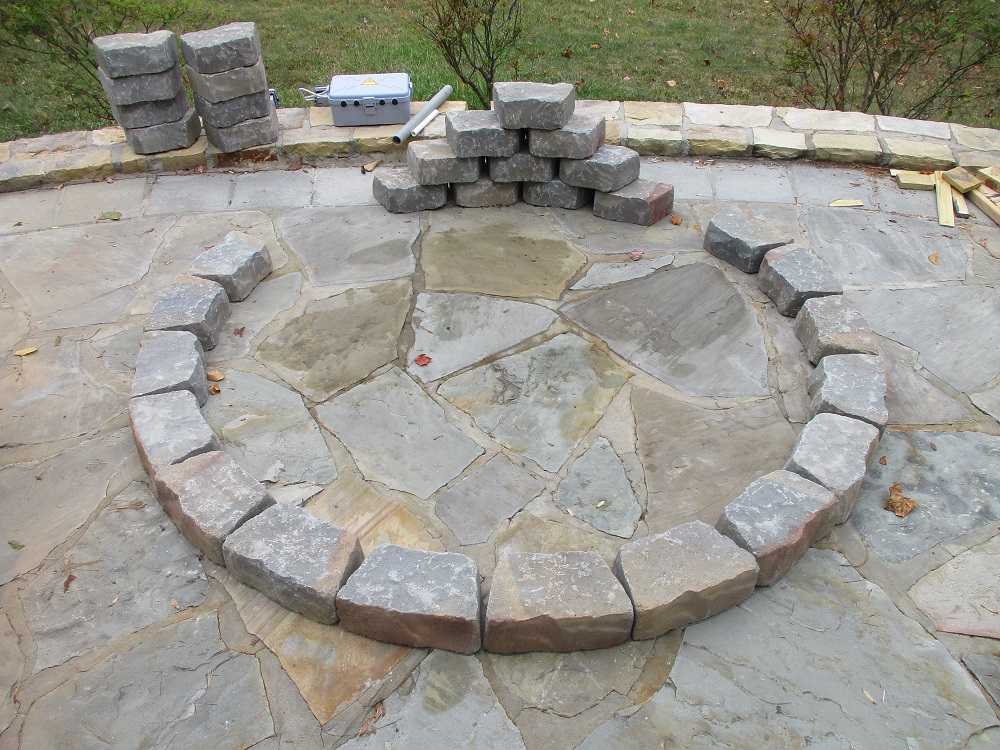
This helped to approximate the final position of the stones, and thereby find the octagon sides (which were precisely what the Architect’s computer drawing indicated). After drawing pencil lines around this circle exterior, these stones were then picked up and taken to the side.
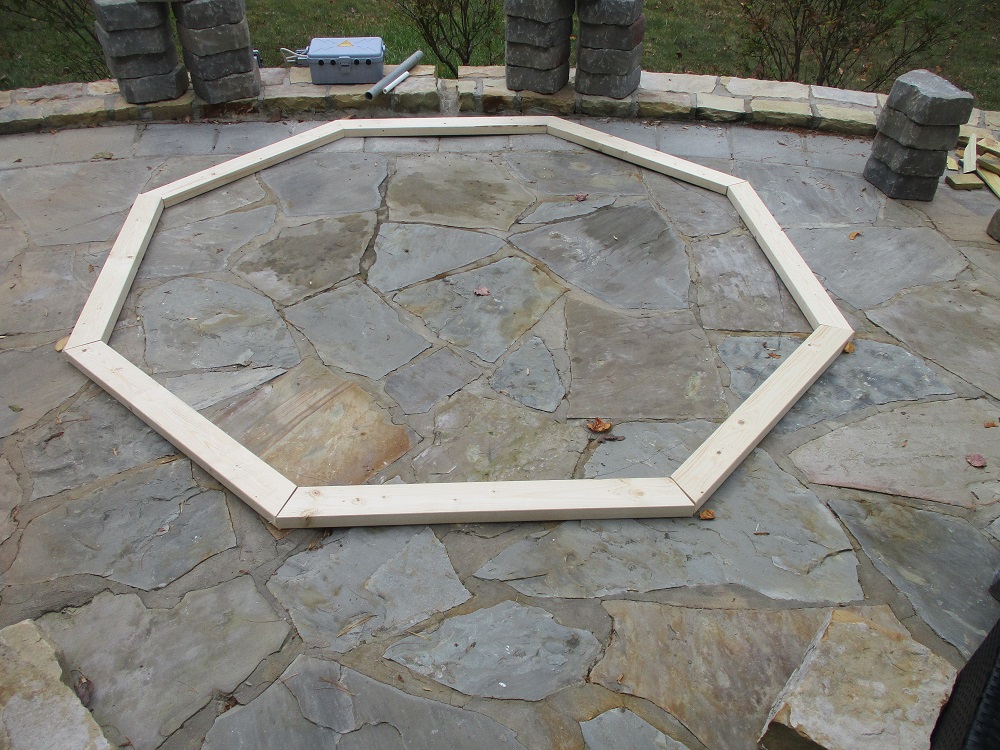
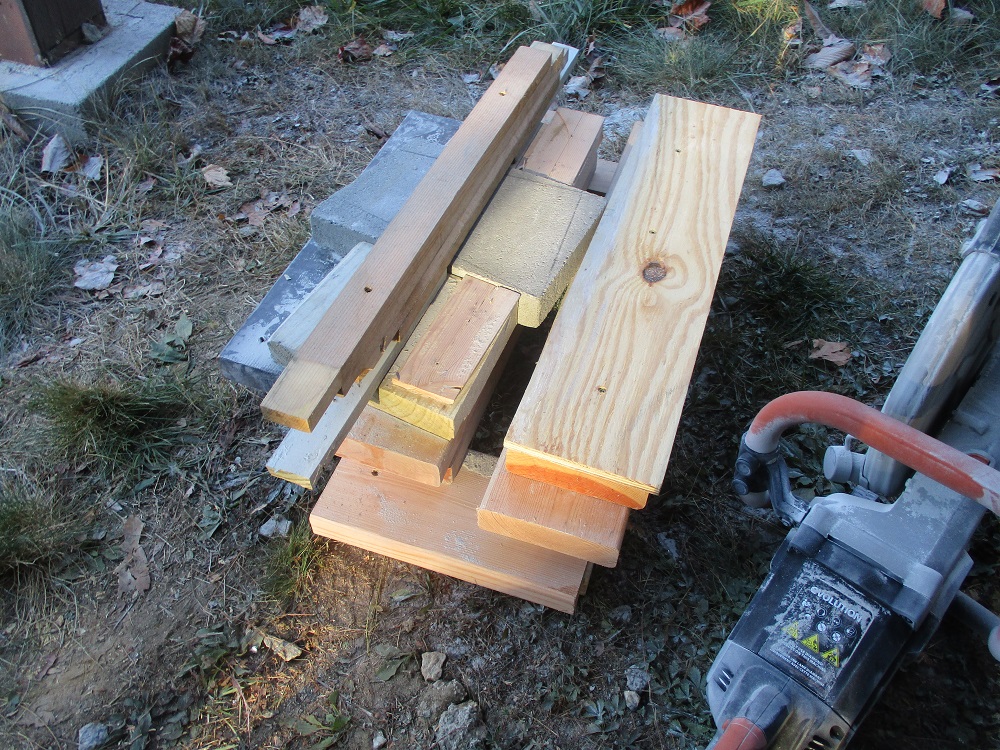
Then (above), economical spruce 2x4s were tapcon connected to the existing flagstones. Unfortunately, the TN flagstones are very hard and most are gray. It is thought that perhaps the gray stones may have a great percentage of granite in them. In the end, the Architect began drilling the holes into the concrete grout between the stones to hold the boards for the forming operation. That was much easier. Note: the smaller Tapcons with nut heads tend to easily strip and are not recommended. Much better to use the 1/4″ tapcons with recessed hex star drive screws, which don’t strip anywhere near as much. Note 2: keep the tapcons well away from the inner 1-1/2″ of the 2x sill plate. Why: so you are able to remove the screws after you have poured the concrete. And the minimum thickness of concrete the Architect decided on was 1-1/2″, or the thickness of a 2×4. Why: because if it was much thinner and it would likely crack and fall apart when later removing the forms.
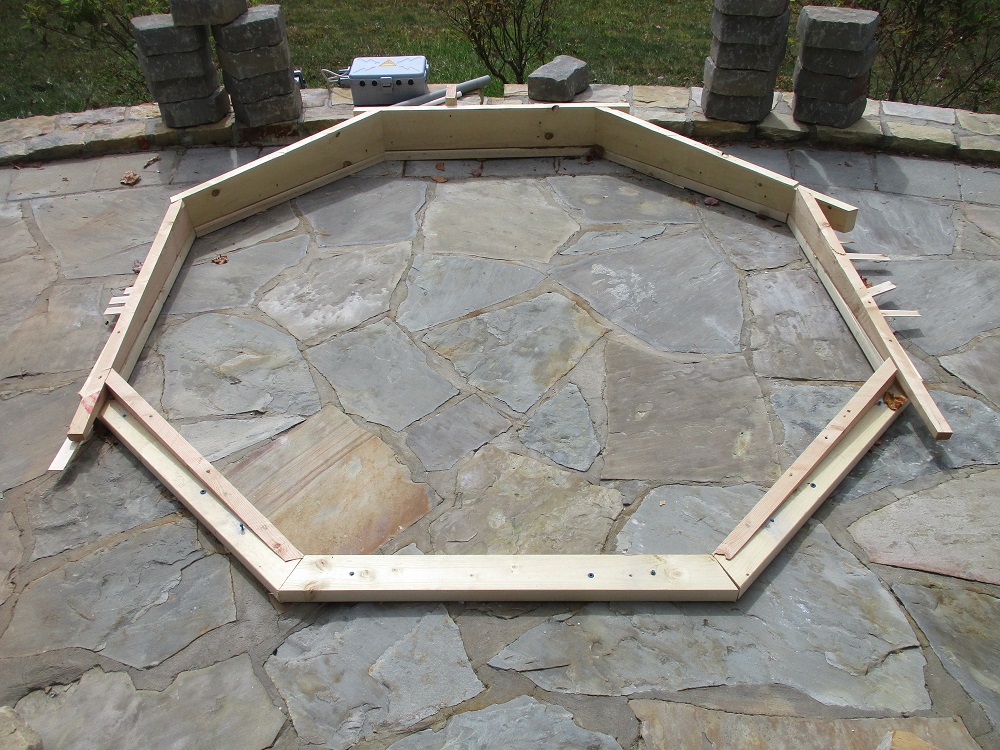
Then (above), 2×8, 2×6 and 2×4 spruce boards were carefully trimmed so that their top edges would be perfectly level with the 1-1/2″ tall flatwise 2x formboard on the north side of the octagon. This took a couple of days. 3″ long star drive screws were installed between the rear edges of each of the vertical form boards, to resist against the pressure of the liquid concrete when it would be later poured. The worst thing that could happen in an operation like this is for the formboards to burst apart during the concrete pour. In that case, everything would have to be redone, including the pumping crew and the concrete delivery. So it is always best to do a little overkill with your formboard preparation.
Next, the concrete pump crew appears about a week later, sets up and informs the concrete plant to send the concrete truck.
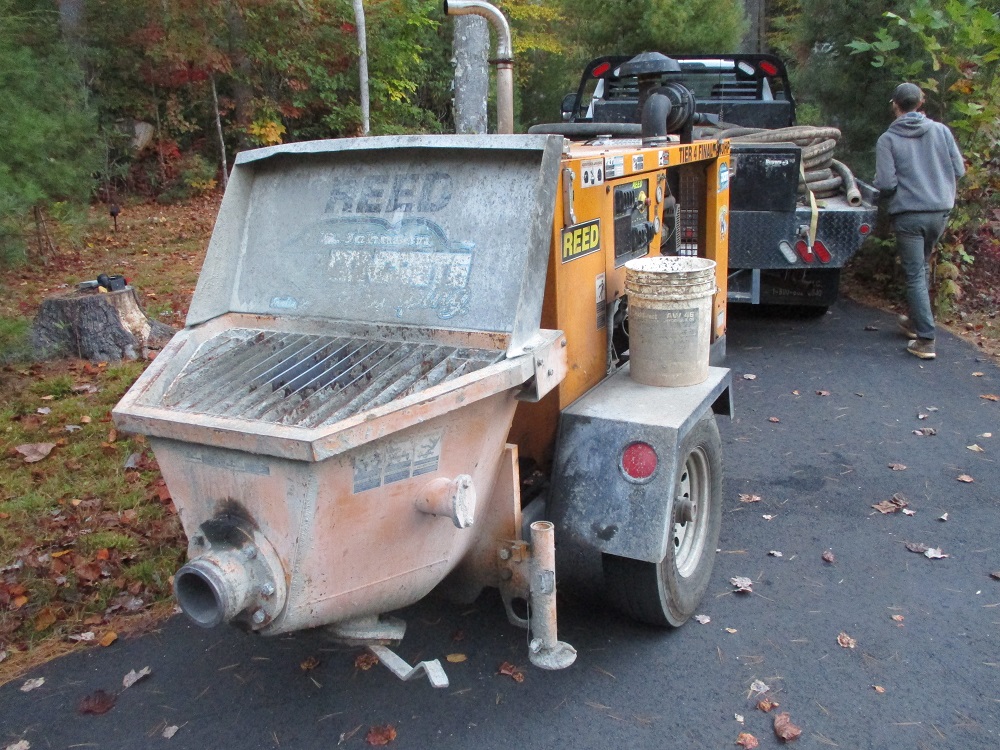
Unfortunately, the concrete company has 3 fewer drivers on this day, which delays all of their deliveries by 1 to 2 hours. But eventually, they appear.

By then, the pump crew has their 200 feet of pump hose already deployed and waiting.
And in case you’re thinking: hey you should have instead bought a few bags of concrete mix and made them inside the formboards. Well, the Architect considered that. That would have taken 33 fifty pound bags of concrete mix. Not to mention all that mixing, all while you’re trying to screed off the drying concrete and get it level. Nope. Concrete truck and pump crew was the simplest answer.

And here we go (above): the concrete crew starts the pump mix into the formboard area for the fountain base. If you look very closely, you might see 2 of the 3 permanent blue tapcons installed into the flagstone layer, and projecting up about an inch from it to serve as pins to secure the new concrete in place permanently, without any possibility of future slippage.
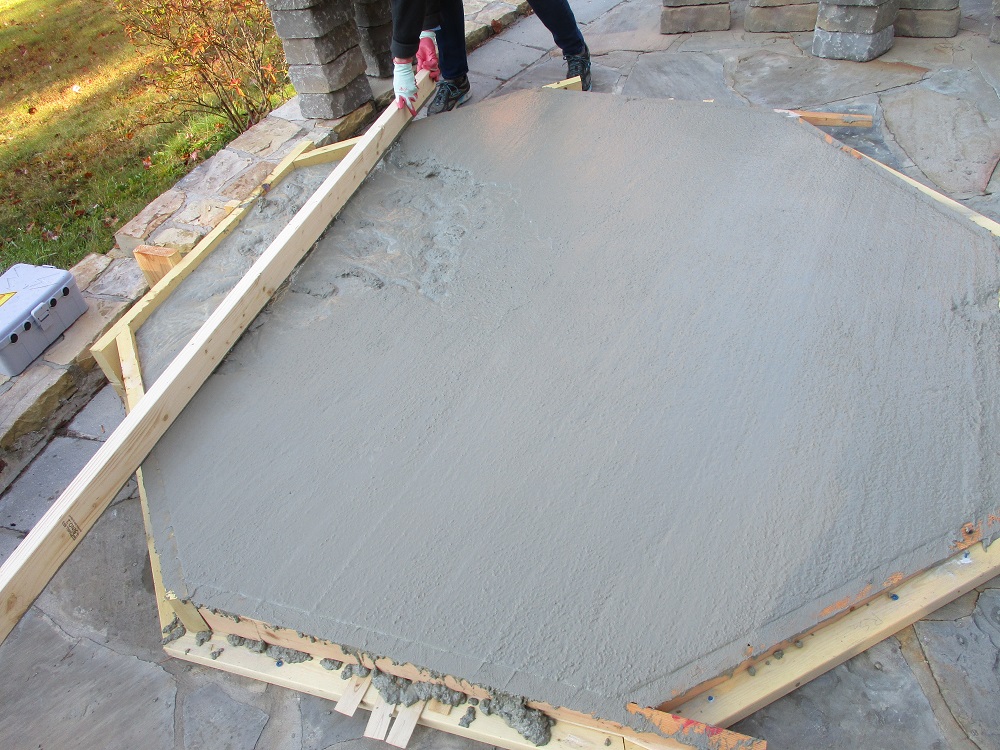
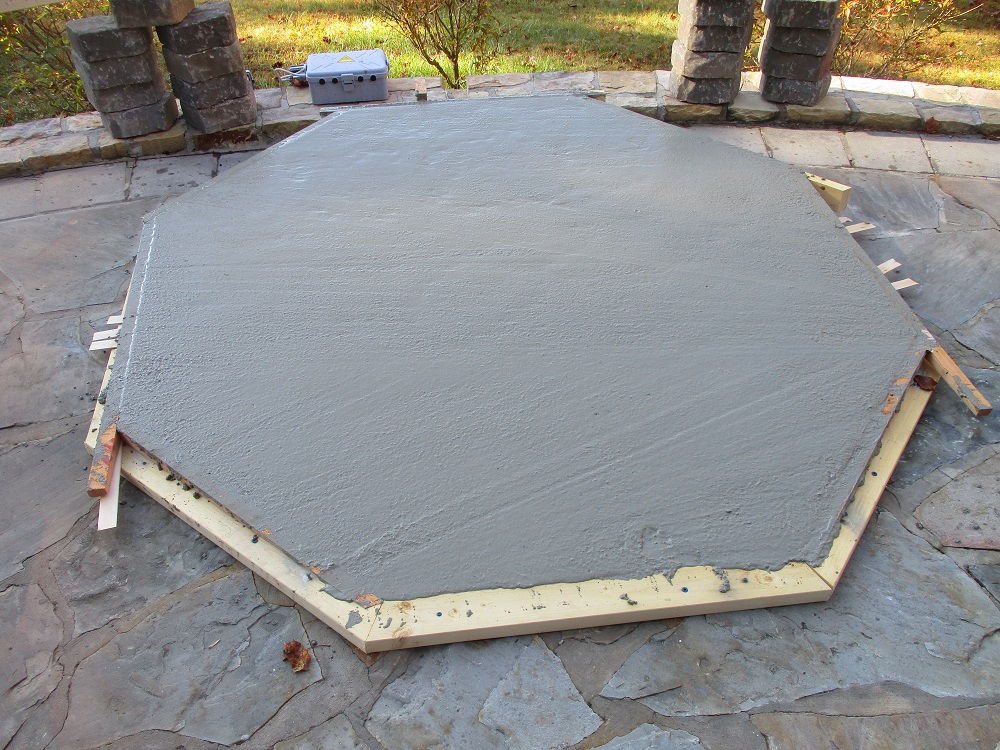
And here’s the Architect and his wife finishing screeding the top (above).
And then, the wet completed fountain base slab (below):
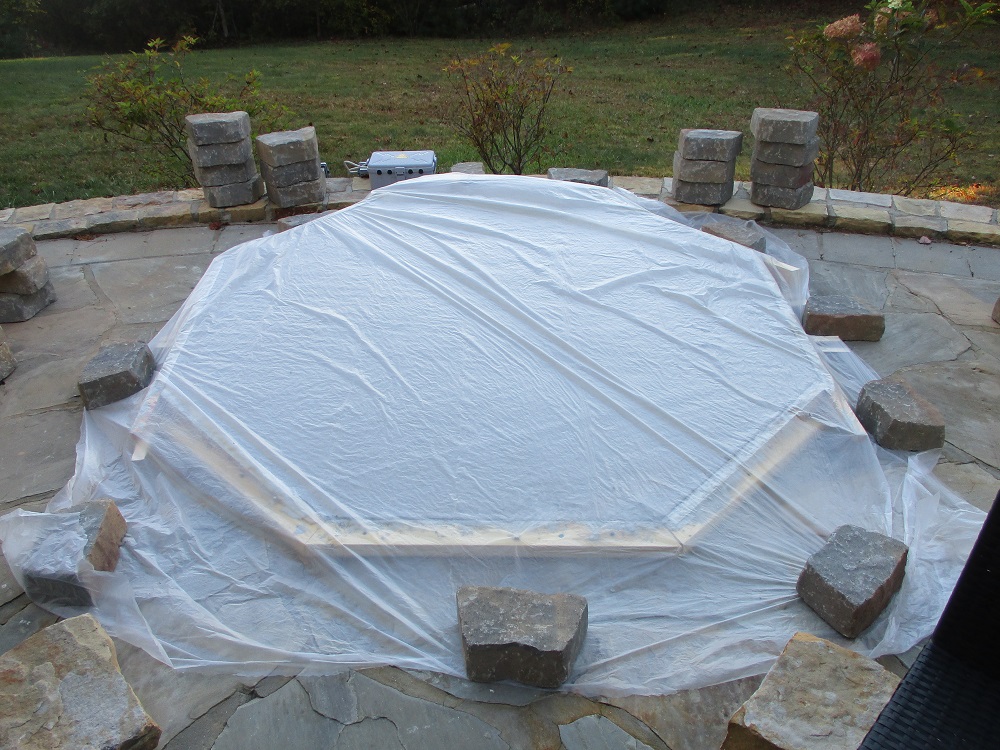
Then the Architect decides to put a plastic sheet over the tack-free dry slab (below, several hours later) to give it some heat of hydration and stop possible shrinkage cracking during the next 3 days and nights, which have become a bit cool after the sun goes down. Keeping moisture in the slab longer helps prevent cracking and makes the concrete stronger. And the mere act of holding the moisture in it keeps it warmer.
And here, (below) 3 days later, the slab is dry enough to walk on and work on, and strip the formboards, although it won’t be 90% cured for a couple of weeks.

The Architect had some concerns about possibly breaking the edges of the slab while knocking off the formboards, but he carefully oiled the forms with WD40 twice before pouring the slab, just to insure that the wooden formboards would not stick to the curing concrete. Also note that the octagon was built several inches away from the southern stone rim of the patio to allow for continued water drainage off the patio and around the new fountain base.
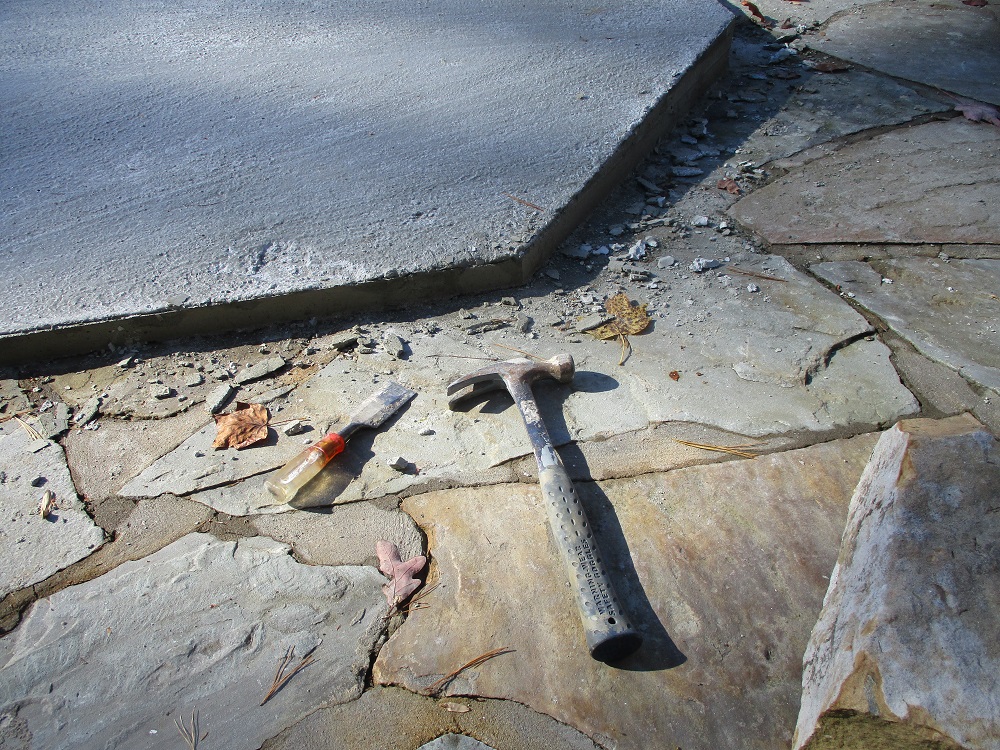
The Architect used a chisel and hammer to chip away some concrete leakage from the lower perimeter that slightly oozed onto the flagstone. (above). Easy to fix. But requires care.
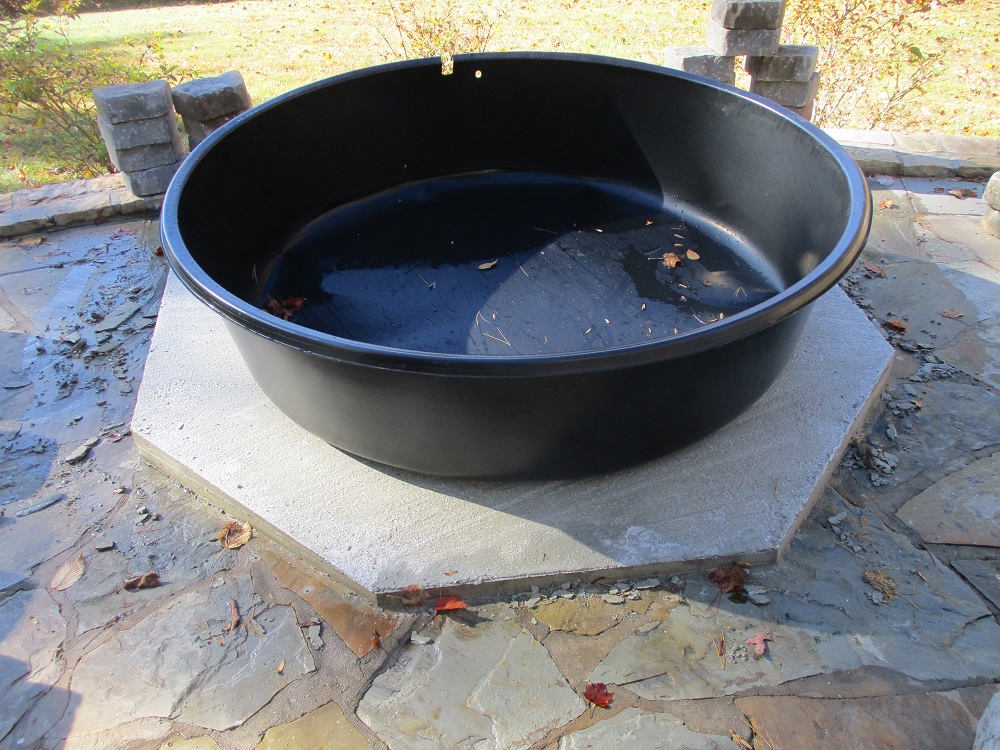
And so now, here we are ready to place the plastic fountain basin on top of the new level concrete slab (above). The black plastic basin is 72″ in diameter and the rim is elevated just slightly less than 2″. Note the notch and smaller, slightly lower bore hole. They are for the electrical conduit for wires for the basin lights and fountain pump, and the smaller bore hole is for a drain spillover PVC pipe.
Next (above), the colored concrete trapezoid blocks were stacked partially up around the black water basin to insure the blocks were in the correct position (snug to the black plastic basin).
Then, after dry-setting the rest of the concrete blocks, the plastic basin was pulled out. It emitted a kind of suction-like sound (“whummpff”), so the Architect deemed the fit good and tight. See below for this status. Also note that the Architect’s intent was that the concrete blocks were to exactly touch the exterior edges of the octagon mid-points. Mission achieved. Dry-set joints were tightly placed together.

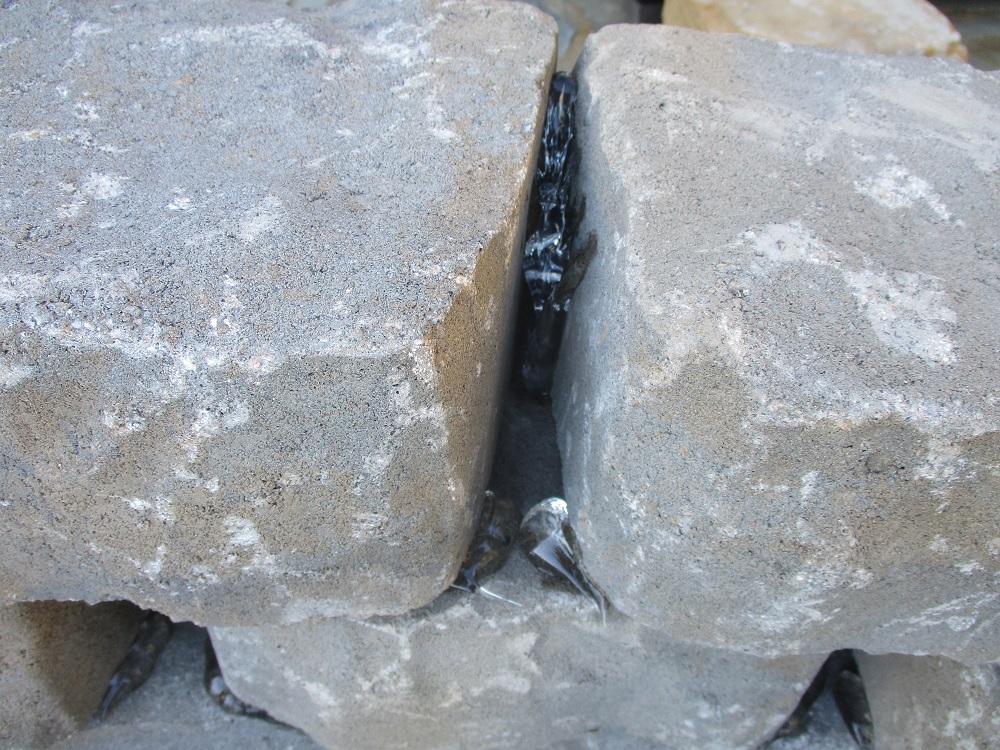
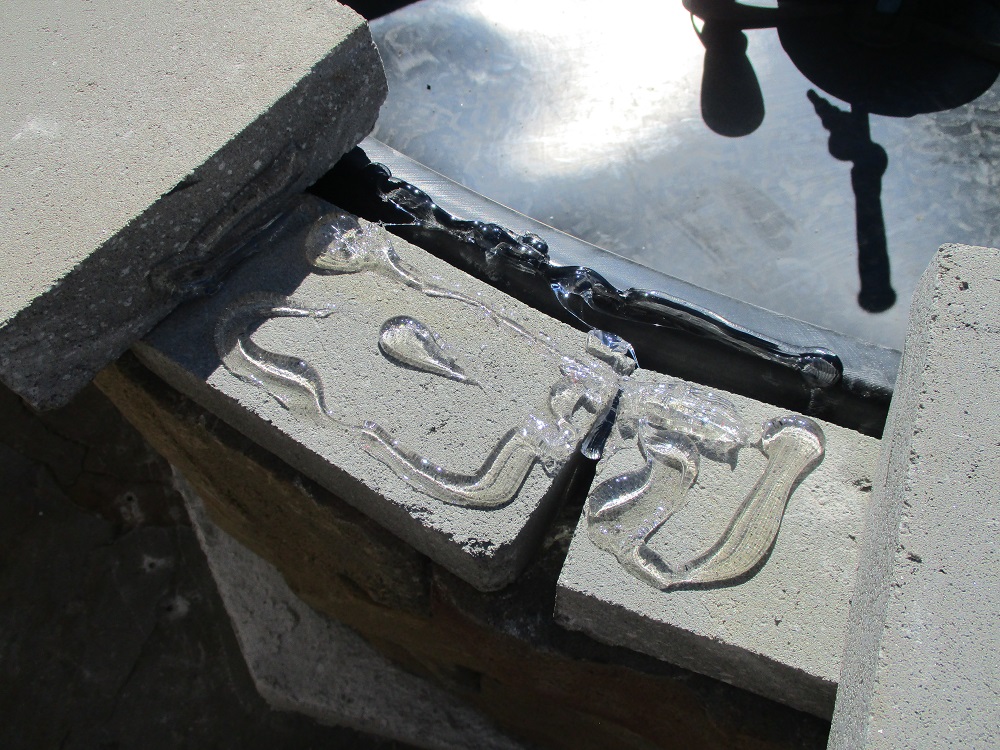
And next, each gap between the concrete blocks was glued with Lexel sealant (see above). This was installed from the inside of the circle, so that 95% of the sealant remained invisible, for a good dry-set clean look.
Then, below, the Architect has been planning all along that the gauged concrete blocks would just meet the height of the underside of the plastic basin rim, so that no blocks would need to be cut. Which greatly simplifies construction. The perimeter of blocks was established to tuck under the top basin rim, sealing off the top. The blocks are each 4″ tall (4 courses = 16″, which is why the Architect investigated and purchased the plastic fountain basin which is 16″ to the underside of the basin). Once again, this greatly simplifies construction.
And now (below) see how the gray electrical conduit, and white PVC drainage pipe fit into the heights of the concrete block coursing. The gray electrical conduit was placed to be about over the right entry wide of the electrical junction box below, attached to the stone rim. The white PVC water drain pipe was placed up above the scupper slot drain in the stone rim edge below.
The black rim of the basin is just slightly less than 2″ tall, so the gray concrete top courses were selected because they are precisely 2″ tall, which allows for application of sealant on the stones below and next to the black rim, then the top 2″ concrete trim will be sealed over the top black rim, once again, keeping the installation as simple as possible.
And then one of the most difficult aspect of the construction: cutting of the double top course of gray concrete 2″ thick cap layers (below).
This procedure ended up becoming complicated. Why: you don’t just cut pieces of concrete with a powerful 12″ diamond rotary blade saw. Something has to secure the piece of concrete, or the pressure you put on the concrete from the saw will move it, and your cut will be off, and you might also endanger your foot, leg, arm and hands.
Solution: you have to build a “jig” (above), which is a wooden box that allows you to insert the part you need to cut at a certain angle. In this case: 44 identical radial cuts had to be made. Which is a good excuse to build a jig that holds the approximately 22 identical pieces of concrete (one at a time) in position for the concrete saw cuts to be more safely made. Note: a person still needs to protect themselves with lexan eye goggles, hat, mouth and nose filter, thick construction boots, construction gloves and other PPE. This is inherently dangerous. Note: a jig can be made from scrap lumber and screws. It will be heavy and cumbersome and useless, once the task at hand is over.
The first top course was actually a sub-course, in more narrow sections (above).
The actual top-top course was glued onto this sub course with Lexel, according to the Architect. The use of Lexel accomplished a couple of things: helped provide a more water resistive joint between the concrete top trim courses and the plastic basin rim, and also made this joint more flexible and less prone to cracking (as mortar would have done).
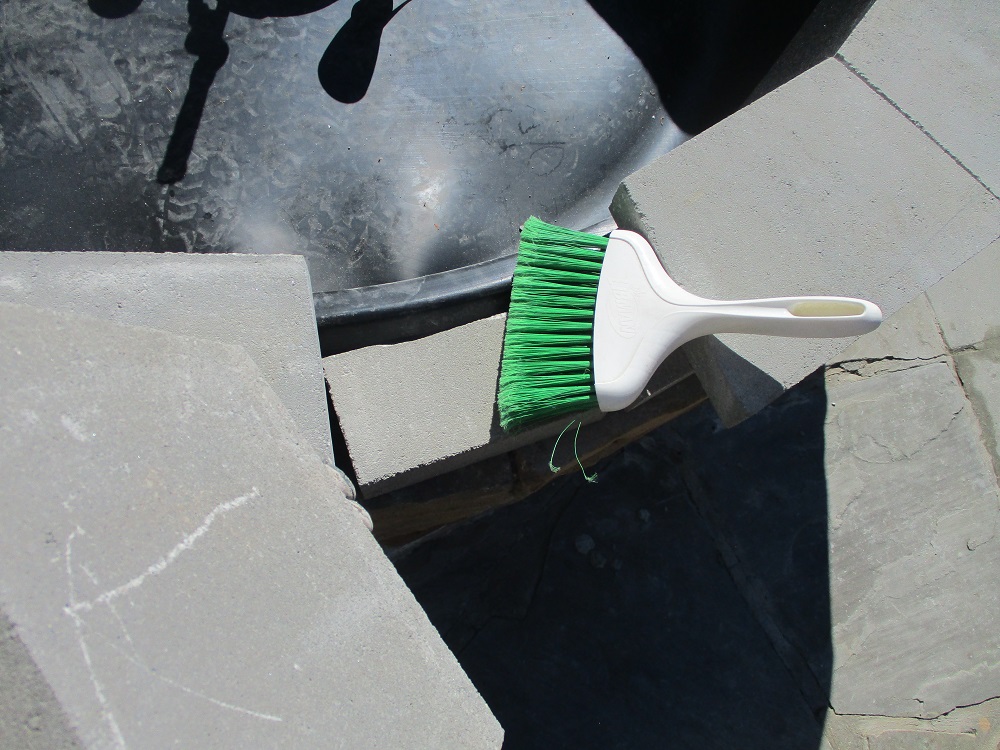
Before the application of Lexel, the pieces of concrete trim were all thoroughly brushed off (above) with a cleaning brush. If this is not done, the concrete dust on the pieces will weaken the sealant bond.
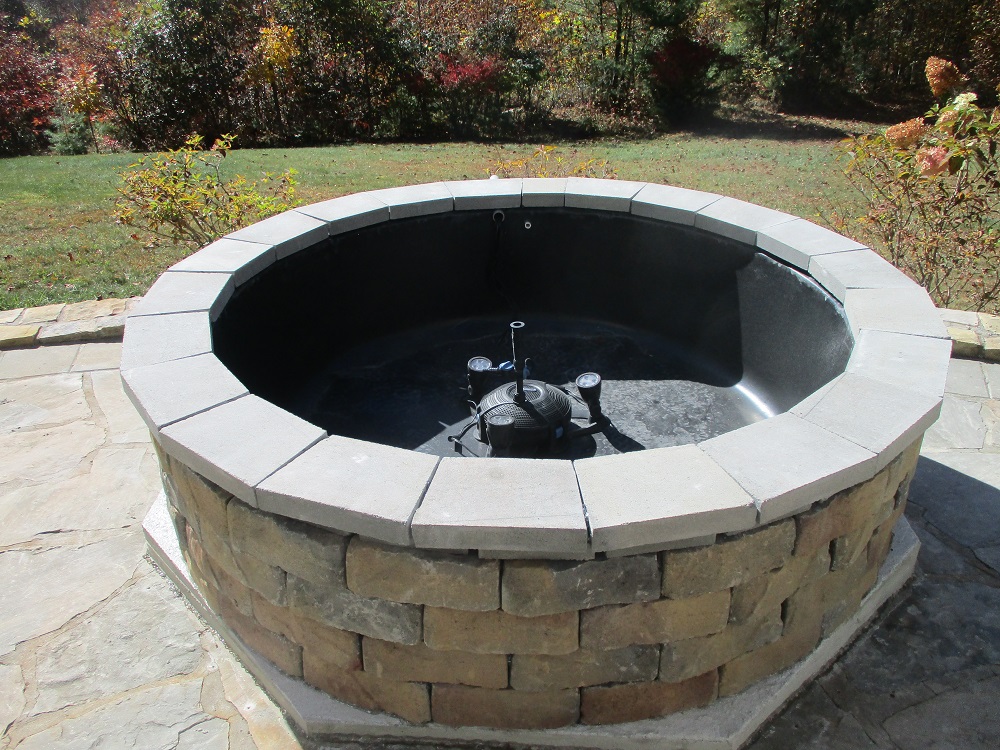
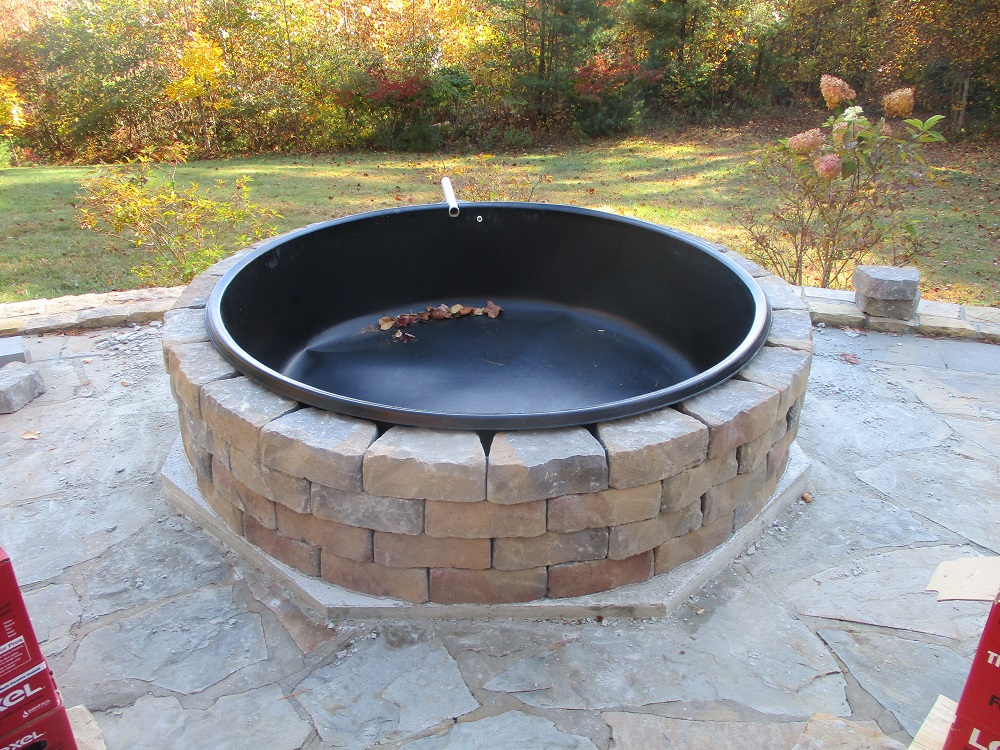
And so now, the Architect has a completed photo of the fountain, with the lights and pump placed in the basin (above).
And below, with water from a garden hose having filled the fountain, with the “gusher” fountain head.
And here (below), at dusk with the LED lights and “daisy” fountain head in full operation.
This concludes the fountain on the patio assembly.
However, in the end, the Architect ordered a more powerful pump so the gusher fountain head would be higher.
COSTS
Fountain basin (Lowes) : $314.09
Exterior electrical connector box (Amazon): $58.0
Surge Protectors (local hardware store): $56.69
Paint for custom tinting of block: $24.55
Misc Paint: $7.48
Scrap gray plastic electrical conduit: $7.30
The Pond Outlet (fountain pump, 3 LED underwater 3W lights, transformer): $708.83
Misc Paint (Lowes): $13.15
Trapezoidal colored concrete landscape stones (Lowes): $183.18
Trapezoidal colored concrete landscape stones (Lowes): $183.18 (there were 2 loads in an F150)
Misc labor help to move around heavy concrete blocks and get loaded onto patio: $125.
Concrete saw via Lowes delivered: $299.49
PVC drain pipe (Lowes): $4.06
2″ thick Cap block pavers (Lowes): $94.15
Tapcons, formboards (spruce), masonry drill bit: $51.20
Additional larger tapcons, net setter bit: $11.52
Concrete & delivery (1 CY): $384.67
Concrete pump crew: $540.
Electrical labor and materials: $1,700
———————————————————–
TOTAL COST: $4,766.54 all materials.
Labor should have been about the same, but was sweat-equity on the part of the Architect.
In other words, hiring this fountain out to a general contractor with everything should have been around $9,533.08