Installing a Prefab Shed is about the process starting from virgin wilderness to site preparation to placing the shed to constructing a ramp.

This company doesn’t do this very often: talk about prefabricated structures. But they recently went through this process and thought they would share their experience & knowledge with others. If you plan well, it will still be a strenuous effort, but planning (and perhaps an Architect) and managing the process will help keep it on track for a successful result.
Disclaimer: this architectural firm is not responsible for anyone’s lack of engineering, improper site planning, coordination with local building departments, footings, tie-downs and any other items that could result in loss of property, problems and bodily injury. This online article is simply the sharing of personal experiences and in no way is intended to be the one and only method by which you will obtain your prefabricated building in your location. You are totally responsible for following a method that will have the best results for you in your Country, State and County. Always check with your local Building Department to determine what requirements there may be in your location before doing anything.
SITE PLANNING
First, you will need an Architect, or someone who can give you educated, wise counsel on where and how to locate your shed. For instance, in the HA (Home Architects) example, the Project Architect coordinated the shed placement with the rest of the master site plan, which adopted a radial organizational geometry and placed the shed in the NE (NorthEast) corner area of the acreage, out of the way and out of the view of the proposed main house and future studio.
Do your future self a favor and hire a professional (Architect) to locate your shed. There is more to this than you might think, when you stand there and look at your land. You might think: “Hey, I have all this space. I can just throw this shed over there, right next to my fence.” Think again. A shed is a building and will be subject to building setbacks. In other words, in the HA example illustrated herein, there were 25′ building setbacks, which the Architect’s planning took into account and respected.
Also, there can be site drainage issues. For example: this particular location is in a mountainous region with land north of this property that drains down toward it. You will want your land level for the shed. Therefore, you may end up with a situation where large amounts of water from rain falling on the ground on land around you dumps that water down onto your land. You don’t want that happening around and under your shed. So, in this circumstance, the Project Architect directed the excavator to dig a rather large drainage ditch around the northern and eastern edge of the leveled earth pad for the shed. This ditch will forever catch and redirect the large amounts of water coming from the north down and around the leveled pad for the shed.
Also, there may be site utilities in the vicinity of the proposed shed location. You may need site utilities located by a Land Surveyor (and you will need to twist their arms to do so). Even with all of this planning, the excavator still tore into and jerked up an old steel water pipe, that appeared to have been there for decades. There was water in the pipe, but it was not pressurized. In the Architect’s subsequent investigation with the former land owner, this was the remains of an old water well connection, unexpectedly coming from the southern edge of the land, up through wilderness.
And the Architect can help plan a ramp. Because if you want to drive any equipment (like a riding lawnmower) into the shed, it’s not going to just hop up in there. And an Architect can help design the slope of the ramp in AutoCad or Revit, modeling the riding lawnmower and its attachments precisely. You’d be amazed at how detailed of an analysis this can become. For instance, a John Deere x570 with a front motorized shovel and rear frame weights.
That results in about 8′ of machine, weighing about 1,200 pounds with rider, with some very close tolerances to the ground, ramp and door threshold, any of which can be a show-stopper. You don’t just build a 4′ long ramp and think it’s going to work. Check out YouTube Shed Ramp Fails and you’ll see what we’re talking about. The planning of the ramp (which you can see later in this article) explains in greater detail, just how careful you must be to successfully pull this off.
SITE CLEARING
If you’re truly in virgin wilderness, you’re very likely going to need to remove some trees and stumps. The firm HA contracted with had to rent a large Bobcat with a thumb-bucket backhoe arrangement. Perhaps a dozen trees of various sizes and about another 10 old stumps had to be removed. The large excavator equipment worked perfectly. In this example, the trees, brush and old stumps were taken into the middle of a large meadow, where the owner obtained a legal State burn permit to dispose of all the vegetative debris, after touching base with the closest staffed County fire station. The photo above and below depicts the excavator removing the trees and stumps from the virgin land.
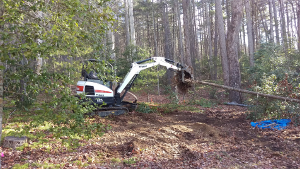
This is not something to be taken lightly. Stump removal is nearly effortless when you have a professional land clearing company do that with the proper large equipment. Trying to do that sort of thing by yourself is dangerous and could maim or kill you. Hire a pro. This should take about one full day (clearing and initial site preparation). Cost: around $1,500.
SITE PREPARATION
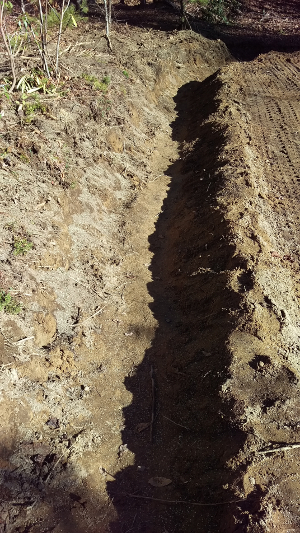
This takes place immediately after all the vegetative matter is removed. Unless you are in a very flat place, you may have some site slope to level. Keep in mind that that rain water melts newly arranged land, unless you do something to stabilize the slopes. Make a 12″x12″x12″ hunk of sand next to a beach somewhere and watch what happens to it when the tide comes in. It melts. So: you not only want to make the ground level, you want to reinforce this new earth pad with something to make it resist erosion. Someone with experience and big machine can level the ground fairly quickly and easily. But you might want an Architect to help determine the level of this shed pad in relationship to the ground around it. In this particular situation, the pad could be leveled about its center area. In other words, the land of the level pad to the north was cut down and into the earth about 18″ and the earth from this was moved to the southern end of the pad and deposited there, resulting in an 18″ tall embankment. But it was not quite that easy. Because now, the large off-site forested area to the north will have large sheets of rain water roaring down onto this newly made level shed pad. Hmm. What to do? The Project Architect thought for a few seconds, and realized that the southern edge of the pad could use some more fill. So, he directed the excavator to dig an “L” drainage ditch, about 3′ deep and 3′ wide around the north and eastern edges of the newly made level shed pad. This ditch connected into a natural “dry wash” that was there on the eastern edge of the shed pad, where water collected in the ditch will naturally pour, thereby protecting the shed pad.
Brilliant! Easy to understand and obvious, once you see it, but this sort of fast-on-your-feet thinking comes from an Architect’s decades of experience dealing with situations like this. And the extra fill earth helped to build up the shed pad, because the Architect directed the excavator to drive his very heavy Bobcat rig over the flattened pad area, 2x in each main direction. This compacted the earth, starting the hardening process for the shed pad.
Note: in a commercial effort using normal construction techniques, the top 12″ to 18″ of soil is normally removed and stockpiled elsewhere for a future garden, because you really don’t want to be using humus and forest detritus (rotting organic matter) under buildings, because this can result in unbalanced settling, over the years, as the rotting material compacts under structural loads. However, in this particular circumstance, the owner was dealing with a 10’x12′ prefab shed that was well-built and bearing on wide foundation blocks and gravel, so this step was not taken in this situation. However, be advised that such shortcuts could result in future settling problems and is not advised.
PAD & DRAINAGE HARDENING
This next step is crucial, if you’d like to keep the investment you’re making. If you skip this step, you’re going to have devastating erosion that will ruin the entire effort. So: do yourself a favor and do the following:
Harden/reinforce the drainage ditch, if your project has one. In this particular setting, the entire ditch was dampened with an adjustable spray nozzle attached to a garden hose and lightly sprayed to dampen all of the ditch surfaces (do NOT use a strong jet of water, but rather a soft haze of water). This becomes the “glue” that will help hold onto rye seed or other grass (it was winter), including on nearly vertical ditch surfaces. The grass seed was deposited through the entire ditch, using a hand-held seed spreader with a hand crank. Took about 30 minutes, going over it about 4x. The idea is that when the seed grows, all of the microscopic roots from the grass will help hold the earth in place and resist erosion from future water sluicing down into the ditch from the north.
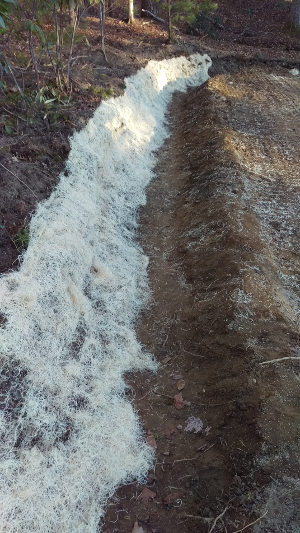
However, marauding gangs of thug wild turkeys became interested in the newly deposited seeds. Therefore, a straw germination blanket was suggested by the Architect, on at least the vertical wall of the ditch. (see above photo). Not only does this help resist local fowl pecking, it helps secure the seed in place until it has a chance to start growing.
Now you’re going to need to have a some gravel delivered. The Architect could have seen larger size gravel up to 3″ diameter, but knew that this size is very difficult to move and impossible to hand-shovel. Therefore, he ordered #57 gravel (around 3/4″ to 1″+/-).

This is the gravel, after flattening by the Owner using his John Deere riding lawnmower with front shovel attachment. The Architect’s knowledge about movement of gravel size facilitated this operation. What you can’t see in this photo is the hand-shoveled gravel the Owner threw into the drainage ditch, to further harden it, particularly along the bottom and the side of the ditch sloping up to the shed pad. Then the Owner used his 1,200 pound rig to drive over the gravel about 4x each direction (including diagonally) to compact the gravel down into the earth.
Can you believe all this effort just to get a hardened pad on which to put a shed? Not simple or easy, is it? You have to think of everything that could happen to prevent future problems.
Also what you’re not seeing: the John Deere front shovel was used to gather and transport heavy, larger rocks (field stone) from another location on the land and dump them along the taller sloping faces of the sloping embankments around the pad. This, over the gravel and compacted earth, gives the Owner a fighting chance to help resist erosion.
DRIVEWAY CLEARING, WIDENING
If you have a long driveway with overhanging trees, you’re going to need to trim those limbs. A prefabricated building of any kind, including a shed, rides high on a trailer, when it is moving along your driveway and you want your building to avoid scratches, if not outright inability to move on the way to the dropoff point. This particular Owner had to stand on the back and roof of his F150 with a hand saw and pruning shears for 3 days, clearing the old growth limbs and branches from his entry drive, along with widening the narrow earth and gravel driveway (which involved in part, having the excavator remove some more old stumps). Once again: better to hire these things out. The Owner had at least one bad fall from the top of his truck, but was lucky, he bounced, rather than broke. Don’t think he’ll be doing this type of work again.
SHED DELIVERY & PLACEMENT
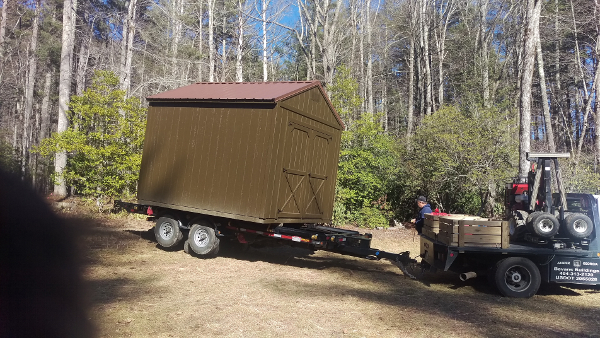
And here’s the delivery truck, trailer and shed! Yay!
There is a slope of about 6′ vertically, over a distance of about 75′ that the driver needs to backup over to position the shed on the shed pad area. Fortunately, this delivery rig was amazing. It has 2 “mules”. Both are gas engine driven and both have 4 tires. One mule is built-in under the trailer itself, and was started by remote control and jacked up the entire trailer, then moved it sideways. The other mule was a remote unit, driven by the driver-operator.

Here’s the shed being off-loaded from the trailer. Once again: this is not an ordinary trailer. It’s a $50,000 rig with moving tracks that allow the shed to be placed anywhere this experienced driver wanted it to go.
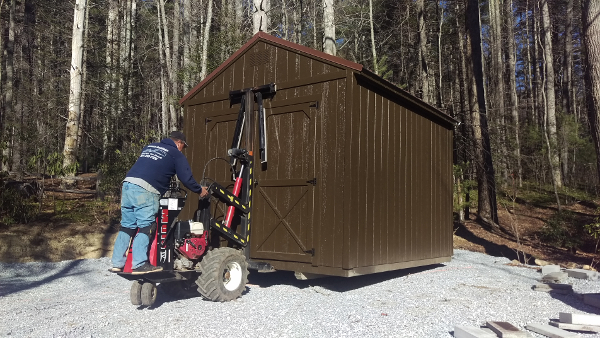
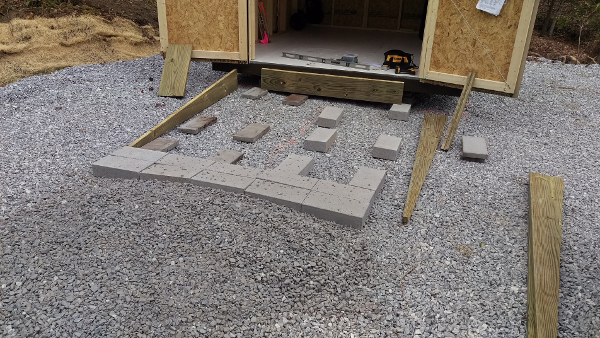
Here is the operator using his portable mule to do the final positioning of the shed. He also uses the mule to pick up first one end, and then the other, to allow the 4″ cap blocks to be placed over the gravel (to support the main pressure treated skids of the shed), and to facilitate leveling. Note: the Owner’s compaction of earth and the gravel obviously worked, otherwise this heavy mule and shed placement operation would have been problematic. See other YouTube videos about shed installation fails where the Owner did not compact the earth or gravel and the mule and shed sank down into the gravel, making a mess of this step.
Note: using solid cap block like this is normal, within the prefab shed business. However, this is not how normal foundations are engineered for normal structures (like a house) and you should consult with your local building department to verify what is allowed in your jurisdiction.
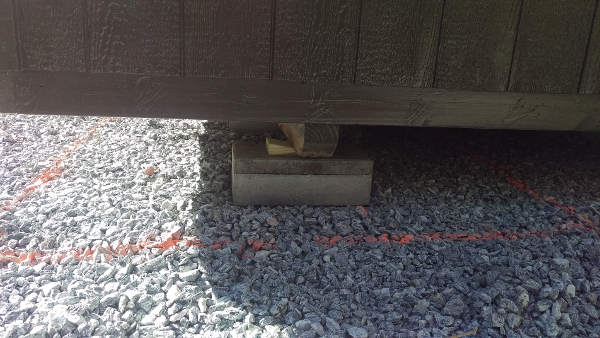
Here is a detail shot of one of the cap blocks. This particular assembly involved a 4″ (nominal) solid concrete cap block, a 2″ cap block and a p.t. wood shim, to level the shed. Note that the Owner had used Contractor’s orange marker spray paint to precisely show where the rectangular outline and centerline of the shed was to be placed (per Architect’s Site Plan). This made it easy for the driver with the mule to place the shed in the correct position.
SO HERE THE SHED SITS. NOW WHAT?
Okay. Good job. Now how is that John Deere going to get up in that new shed?
RAMP PLANNING
This is a big deal that can make or break the entire project. If you get the entry angle or breakover angle wrong, the mower will catch on the lower ramp or on the door threshold. You may want an Architect to plan/design this for you.
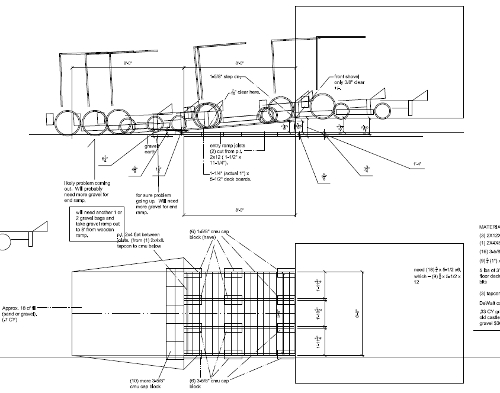
It takes an experienced, detail-oriented design professional with a special graphic modeling program, like AutoCad.
RAMP CONSTRUCTION
You should check with your local Architect and Engineer to avoid problems. This particular solution involved use of p.t. 2×12 ramp stringers bearing on cap blocks (once again, not the normal “permanent” type of construction for a house, but keep in mind: this is for a detached shed and a lawnmower).
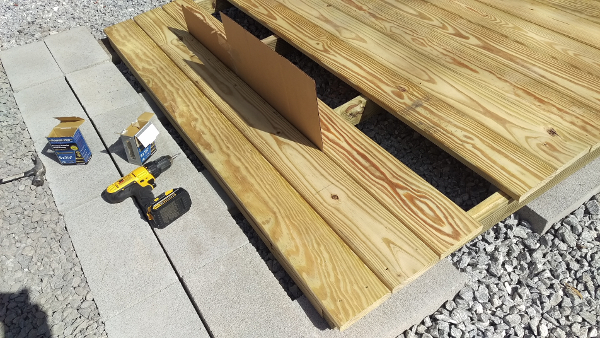
Next, the cut members were assembled, using quality outdoor 3″ deck screws (#9) with star bit drive recessed heads. With the DeWalt cordless 20v drill, these went into the p.t. wood like a hot knife through butter. A pleasure to use and much stronger than nails.

Note that the Architect recommended cross blocking between the stringers to prevent the heavy load of the riding lawnmower from causing rotation of the members and keep them in position. The top cross nailer board was also screwed into the shed floor edge just below the doorway to secure the ramp to the shed. However, note how the nailer board and all stringers are actually directly bearing on the cap blocks, which bear on the gravel. So while this is an unconventional method of support, it should be strong. P.t. shims were used to level the bottom of the ramp stringers. Before securing ends of the lower ramp to the cap blocks with tapcons, Owner checked the squareness of the ramp framing by taking a diagonal measurement with a tape measure. In this case, it was exactly 119″ for both diagonals, which meant the ramp framing was perfectly square.
Note that the shed doors have a 1-1/2″ vertical overlap (lower than the door threshold opening at the floor). Therefore, the Architect’s ramp had to take into account two important facts: the door overlap and the vertical distance the front shovel was in its highest position (to miss the door opening threshold). Lots of things to think about when designing this ramp. Not what most people are used to doing.
And at last the ramp deck boards are being screwed down. Note that a 1/4″ piece of corrugated cardboard was used to make a slight gap between the boards, which allows for drainage and makes the ramp have more friction. All the deck boards where placed into position before screwing began, to insure squareness. Then one board, next to the bottom was removed, to allow for working space. Note that the Architect designed the ramp boards to overhang the side stringer by an inch, to help avoid splitting of the deck boards when screws penetrate them at the side stringers (the farther the screws are from the ends, the better).
The double row of 4″ cap block at the bottom of the ramp functions as a heavy curb to contain the gravel there, and helps to stabilize the position of the lighter wood ramp. When thinking of driving a thousand+ pound machine over this for years, stability is important.
The ramp stringers were designed as 1-1/2″ tall at the bottom. This allows for screws to attach the deck boards. Also, this dimension allows for a p.t. 2×4 at the bottom to help secure the lower ramp assembly to cap block supports with tapcons. The lower ramp screws were 1-3/4″ long near the end, then after about a foot of length, 2-1/2″ long decking screws were used, then at about 18″ or so from the bottom the main 3″ long deck screws were used. This variation in screw length allows for the fact that the ramp stringers don’t have as much height near the lower end.
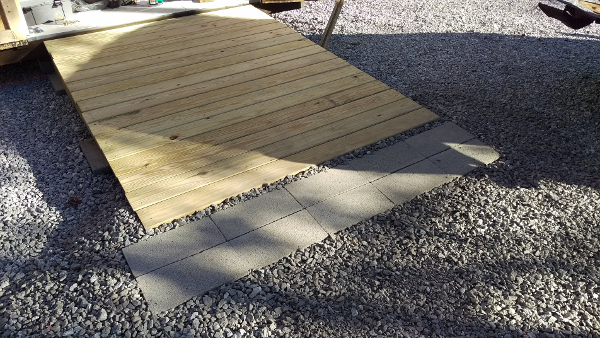
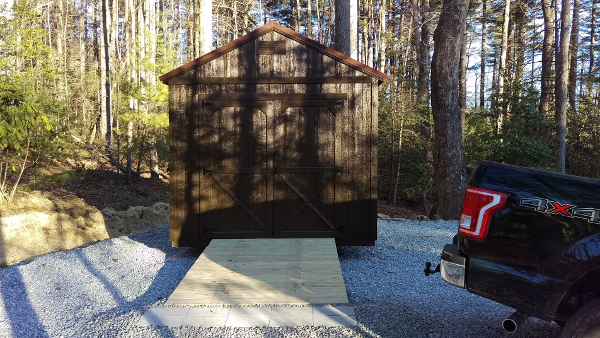
And so here we have the completed ramp. Note the precise step up at the shed threshold, accounting for the door bottom vertical overlap and the minimum necessary to still allow the front shovel on the John Deere to clear the shed entrance.
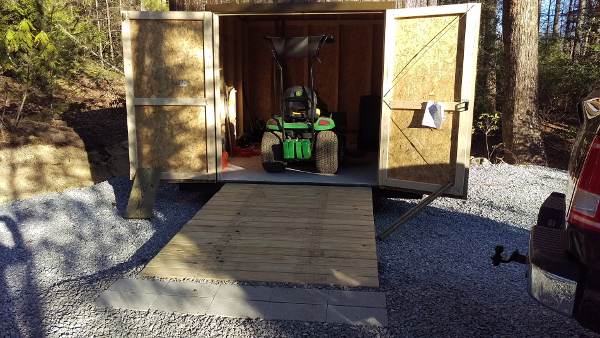
And here we have the proof: the John Deere successfully climbed the ramp, cleared the door threshold and drove into the shed. Success! At long last! The proof of good planning and hard work.
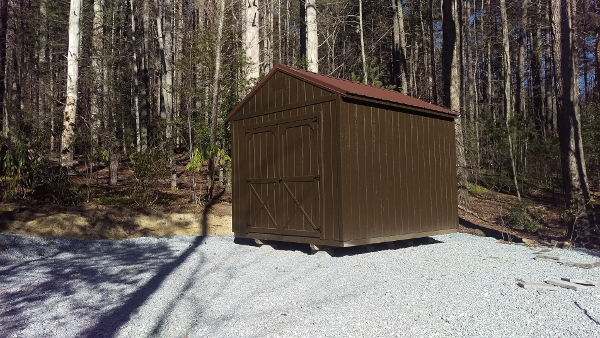
And the closed door view of the final result.
Whew! Lots to think about when planning and installing a prefab shed.
tags: installing a prefab shed, timber frame, Cashiers, NC, highlands, glenville, sevierville, post and beam, residential, alabama, lake tahoe