Exhaust Vents in Houses is about how a leading Licensed Architect who designs houses approaches this subject. It’s not quite as simple as you might at first think.
HOME ARCHITECTS ® has been designing residential architecture for around 48 years. They’ve learned a lot about this complex thing called a house. With a residence, nothing is quite as simple as it seems. For instance: exhaust vents.
Is the exhaust through a side wall, up through a roof, into a soffit, or down through a floor? See what we mean? Let’s try to simplify it just a bit. Let’s look at side wall vents.
Some people might at first believe all you do is run an exhaust duct through a wall and you’re done. No you’re not. Not if you’d like to keep out pests like chipmunks, birds, insects, rain, snow, ice, cold, heat, humidity and other outside world elements from getting into your house. What do we mean?
If you simply cut a hole in a side wall and jammed a round or square duct into it connected to a fan from somewhere inside the house, you will have a 4″+/- diameter hole, and possibly larger. And with nothing to deflect rain or outside air or keep out bugs and birds and other critters, your house will shortly become the home of other creatures who are not welcome and also admit water into your house causing rot,
mold and structural damage, not too mention energy inefficiencies that would be difficult to handle.
So: now things start to get interesting. You need to have something near the end of the duct (or at the end of the duct) that keeps out (let’s list them):
1. Rain and other forms of precipitation.
2. Wind and outside air and humidity.
3. Birds, squirrels, bugs and other pests.
4. Unwanted air transfer from the inside to the outside and vice-versa (called infiltration).
That is the Big 4 List.
Now then, suppose we put some sort of DAMPERS at the outside wall. Perhaps something very economical. Like a 3 or 4-panel el-cheapo duct damper. Okay. Hmmm. Some Contractors actually use these. And they simply nail them to the exterior finished wall of your house. Does this solve all the penetrations in the Big 4 List above?
No. Not by a long shot.
“Huh?” You might say. “Why not? We don’t need an Architect to solve little things like this!”
Well. Maybe you do.
Let’s delve deeper into this often overlooked detail…
Okay: so a builder tacks on a 3-horizontal vane residential air damper, thinking this is going to keep out rain, wind, birds, bugs, squirrels and unwanted air transmission. Let’s examine the reality. Here’s the ugly truth:
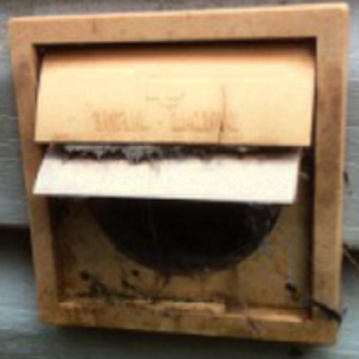
After just 3-1/2 years, here’s exactly that sort of builder “damper”. Not only does the damper (even when new) NOT keep out any of these things, but look what happens only 42 months from the original installation.
See that big horizontal hole near the bottom? That’s there because the flimsy horizontal plastic panels weaken in the constant UV (Ultra-Violet) radiation from the Sun, and are worked to a frazzle by the nearly constant winds. Resulting in: the panels eventually falling off. Yep. That bottom hole is the direct result of the bottom horizontal panel falling off the house and down into the dirt below, where it has blown away. And don’t get us started on all the water that is for certain coming in around the rear of the housing, because it is face-applied.
So: with an opening that is constantly open of approximately 1-1/4″ tall x 3″+ wide, just about any small creature can crawl or fly in there. Birds, chipmunks, and as we watched… wasps began emerging. In other words, there is a wasp nest INSIDE THIS HOUSE, in the ductwork and if there are any breeches in the ductwork, possibly in the attic. Kind of gives you the “creepy-crawlies” doesn’t it? A teenager might say “Eeeooo!”
And what about the nearly 200 inches of precipitation this particular location receives each year, much of it wind-driven? Do you suppose some of that water is perhaps getting into this hole and running down inside the walls, where it is growing mold, rotting wood, rusting nails and haboring other organic elements that might not be particularly healthy for human beings?
Click here –> for healthy residential architecture.
And how about the very air itself? This so-called damper (what’s left of it) is connected to a duct that is connected to a bathroom ceiling vent fan. Because it is open on the outside end, that means that the outside air can simply CONTINUOUSLY travel along the duct and into the bathroom where it then gets distributed by the Brownian movement of air molecules throughout the rest of the house, taxing the heating and cooling system during winter and summer. Not a very efficient situation for someone to have. Does the original Builder care? What do you think?
Architects sweat the details. They’re into R&D (Research & Development). They want things to work correctly, durably and efficiently. They care about the project and they care about their Clients. Your Architect is on your side. Think this is the ONLY situation like this in a house? There are HUNDREDS. Any one of them can pick your pocket when you pay your energy bills, make you sick with mold growth, rot your house down around your ears and allow the woodland creatures to set up house in your residence. Do you really want to allow that? No? Then hire an Architect to design your next house. You’ll obtain a much higher quality result than if you didn’t. Reasons to hire an Architect.
Okay, back to our one, small detail condition: Exhaust Ducts in Houses. So what would an Architect do about this situation?
Let’s start with Condition #1 from the Big 4 List above:
1. Rain and other forms of precipitation.
What would an Architect think about how to go about keeping water out of the end of a duct exhausting to the exterior?
A. The Architect would first and foremost: not be so bold as to have the duct exhaust horizontally out of the wall at the extreme end, even if the duct is a horizontal penetration through the side wall. No. The Architect would be concerned that water either falling from gravity, or from being wind-blown, might get into any horizontal open end. So: the Architect would vastly prefer to have a termination outside the wall that exhausts Not horizontally, certainly not Up, but rather DOWN.
How would this be accomplished? There would need to be a device known commonly as a “Wall Cap.” This is ENCLOSED at the top and sides and open on the BOTTOM. That is where the exhaust flow is released into the outside atmosphere. Great. So now we have satisfaction of our first desired functional feature.
AA. However, we are not totally done with this issue, hence the “AA” list designation. Why not? Because water running down the outside wall can work its way into the cracks between the exterior cladding (often wood or Hardie siding) and the wall cap.
What to do? Before you say “caulk it”, you should know that Architects deem “caulk” to be a cheap substance for INTERIOR joint filling, as it is often composed of latex. If you “caulked” the joints involved with this inferior interior material, it would fail in less than 18 months. So: you need to take some more precautions.
You use SEALANT, which to an Architect is composed of a much more durable and elastic substance than mere “caulk.” And before you say “silicone”, you should know that silicone unfortunately delaminates from one of the surfaces of the materials it is holding together when used in an exterior application between rough materials. Silicone behaves best when used between 2 surfaces of glass, like in high-rise buildings. It really isn’t a 3-sided joint filler and the result from attempting this will end up in failure ultimately. What to do?
This is another reason that Architects exist. They don’t jump to hasty conclusions. They have a theoretical background and research ethic that results in them finding better answers.
Okay, so what is the answer?
It is not just as simple as selecting a better sealant.
ALL sealants will eventually fail, even the ones used in NASA space capsules. So, it is most desirable to position components in such a way as to result in them permanently shedding water when water reaches them (not if, but when).
Therefore, the Architect will want the wall cap to have a self-flashing rim: a fin that projects out from the wall cap and integral to it.
Then, the Architect will want to see this flashing rim tucked up under the wall waterproofing membrane (some call this a “vapor barrier”, even though this designation is debatable). The purpose of the membrane is to keep out liquid water, while allowing gaseous water from inside the house and inside the wall itself, to be released to the exterior. This is the subject of another entirely more detailed analysis that will not be discussed here. You can find that discussion here: SupR-Wall.
Are we done yet? Nope. So the integral flashing fin around the wall cap in an Architect’s detail is tucked up under the exterior face of the wall water membrane. Excellent; this will keep any water that penetrates the siding/cladding from getting into the top of the wall cap.
What about the sides of the wall cap? Should the flashing fins there be inside or outside the wall waterproofing membrane? INSIDE. That way, the water can’t get into the side or top so far.
And what about the bottom flashing fin: inside, right? WRONG. The bottom flashing find Must be placed over the exterior face of the wall waterproofing membrane, so that any water running down its face will be shed over the exterior face of the membrane, making it very difficult for the rain water to get into the wall cap. Well done!
Done yet? No, not yet. We still have to deal with the siding/cladding and this can be a bit more complicated.
(Are you beginning to understand just how complex designing a thing like a house is? There are HUNDREDS of situations equally as complex as this one small detail and the ramifications are huge). And we are examining only about a 6″x6″ area. A house is much larger than that, with numerous conditions demanding equal attention and focus of good intent and knowledge.
So: the siding/cladding. This situation can vary, depending on the thickness of the flashing fin of the wall cap. If the flashing fin is thin, it can be fairly simple: you deal with the wall waterproofing membrane as indicated above, then you fasten the siding to the wall, then use a high quality sealant around the joint between the wall cap and the siding/cladding. What kind of sealant: at least something as durable and flexible as Lexel by Sashco, who developed the product to be an economical whole-house sealant that performs well under a variety of circumstances, but better still would be a polyurethane N1 (single component) sealant that is one of the most durable and elastic sealants available.
However, the above condition can become more complicated if the wall cap flashing fin is thicker, as they are on some popular models. Many Builders will simply nail then on to the exterior face of the siding/cladding. We do not believe this to be wise. Why: because there is then the TOTAL reliance on the sealant (which will eventually dry out and fail, no matter what it is), because the horizontal and side edges of the exterior surface applied solution is totally exposed to the exterior. The sun, rain, snow and ice will hammer the sealant mercilessly until, one day, small cracks develop and that is the beginning of the end. Water will start to penetrate the joints. Why: because you will never remember to have anyone (especially not yourself) to maintain these joints.
So: in this case, the Architect would want to still have the thicker wall cap fins installed properly with respect to the exterior side of the wall waterproofing membrane, then abut the siding//cladding over the top, sides and bottom of the wall cap, then fill those joints with high quality sealant that remains elastic (particularly if the sealant is protected by the thickness of the siding).
So, even in this eventuality, there is a fall-back solution (Plan B) that gives you half a chance to keep water out of these joints. The Architect would best have a specification that describes the above and a graphic detail (as HOME ARCHITECTS ® does).
Okay: are we done now? No. Why not: because we have only addressed Item #1 in the above Big 4 List. Once again: are you starting to have some appreciation for how complex a house is? And this is just one itty-bitty detail. It ALL matters.
What’s next?
2. Wind and outside air and humidity.
Let’s see…To keep out wind and outside air and humidity you need to have a damper. An Architect will not like the 3-part horizontal exposed panel damper, because it falls apart and is so flimsy it doesn’t really keep out anything. General air currents in its vicinity can open them. And squirrels’ little hands are very capable. So: what might be better?
A solid damper. Okay. Sounds more durable and heavier, since it’s in one piece.
How about its orientation? In the Architect’s opinion, it should have a horizontal axle and be arranged so that ONLY interior air pressure pushing on it can open it in one direction only. So: the damper might want to have its bottom open when interior air rushes through the duct, caused by an interior fan pushing on it and when the fan is turned off and exterior air presses on it, it closes. Great. Good solution. This should do a reasonable job of helping keep out wind and outside air and humidity. If it seals well.
The Architect might also want to insist that there be 2 dampers: one at the interior fan, and the other at the wall cap. In that manner, you’ve essentially got 2 little “doors” closing off the outside world.
And next?
3. Birds, squirrels, bugs and other pests.
Well hey! Wouldn’t the double damper solution above solve this issue? No. It wouldn’t. Why: because there is a dandy living space right inside the wall cap itself, like a little bird house. Just perfect, if a craftsmanslike bird could get their bits of nest-building material wedged in there. So: what to do? Some wall caps actually come with a 1/4″ grid material, like stiff plastic bars, that cover the bottom of the wall cap, and they can have a hinge, so that they can be pulled down to allow cleaning by a person.
What a great idea! Obviously, some wall cap manufacturers have been thinking about making a better device (and they are very low in cost, just not quite as cheap as the 3-panel unit described further above). A 1/4″ gap is the architectural standard to keeping out birds and rodents. So that works.
Now then, we start getting into a safety situation when we talk about bugs. That requires a 1/16″ square grid screen to keep out most insects. But here’s the problem. If manufacturers included this fine screen, it could end up backfiring in the case of dryer vents, for instance, where highly combustible lint fibers are often exhausted through an uncleaned dryer duct and out the exhaust wall cap. You will need to maintain (occasionally clean) the 1/4″ grid already. If you further congested that with a finer screen you could end up plugging the exhaust and possibly causing a fire in the exhaust duct itself, which would take only a few seconds to breech the thin duct material typically used and then start a structural fire in earnest. So: while we’d like to see the insect protection, it’s not worth the risk of the potential of its causing a house fire.
So: we have to not hammer this hoped-for requirement any further, and hope that regular maintenance, a household pest service (like Terminix) spraying around the house once every 3 months, and other precautions (like the double damper) will do their job at keep out insects. After all: if there are 2 solid metal “doors” involved in the system, that’s not a bad start.
And what’s left?
4. Unwanted air transfer from the inside to the outside and vice-versa (called infiltration).
This is really mainly handled by the solution for Item #2: the solid dampers controlled by interior air pressure on them to open when the interior exhaust fans are switched on, and by gravity, dropping back into the closed position when the fan is turned off.
An Architect would probably also like to see some sort of soft gasket around the dampers, or a magnetic seal (which some wall caps feature), but these features are not readily available.
However, any Architect worth their salt would also stipulate that the duct attaching to the stub that comes from the wall cap be both screwed and taped into place (no: believe it or not, “duct tape” is one of the worst construction tapes you can possibly use for just about anything. That is normally fabric-based and will decompose if left exposed and the adhesive will generally fail on a variety of materials. An Architect would prefer to specify foil backed tape when securing 2 metal surfaces together).
Do you know any other type of person on the planet that would possibly be concerned with the complexities involved in a choice involving just this one small construction feature? Any bad choice and things fail. Making the right choice requires a licensed pro: an Architect.
So: we have now reached the conclusion that an Architect would attain to solving this problem (and which the HOME ARCHITECTS ® have, in their specifications and details).
It takes a great deal of mental focus to clearly think through details like this on a custom house design. You probably had no idea there was so much to consider on this subject when you began reading this article. Now you know: multiple this one small detail by about 3,000 to begin to understand the level of understanding and detail that goes into an Architect’s thought processes when designing your next house.
And guess what? If you are talking about a kitchen exhaust vent, rather than a dryer or bathroom vent, it can get even more complicated, with such things as “makeup air” and where and how that air is introduced into the house and when. But that’s the subject of another article.
Contact: Rand@HomeArchitect (dot) com 828-269-9046 www.HomeArchitects.com